Look, we need to talk about something that’s been quietly happening across the internet. That polished LinkedIn headshot your coworker just posted? There’s a solid chance it was made by AI. That perfectly-lit dating profile pic your friend is suddenly rocking? Same deal.
AI-generated profile pictures and headshots have gone from “oh that’s cool but kinda creepy” to “wait, I genuinely can’t tell if this is real.” And in 2026, the technology has gotten so good that the gap between a $300 professional photography session and a $0–$30 AI headshot is shrinking fast.
Whether you need a sharp LinkedIn photo, a fresh dating app pic, or just want to level up your social media presence without booking a photographer, this guide walks you through exactly how to do it — step by step, no coding required, no complicated software to install.
We’re covering the best free option, the best quality option, the easiest “just upload and go” option, the exact prompts that work, and the mistakes that’ll make your AI headshot scream “I was made by a robot.”
Let’s get into it.
Why AI Headshots Are Everywhere Now
Here’s the thing — the world runs on profile pictures now. Think about how many places need a photo of your face:
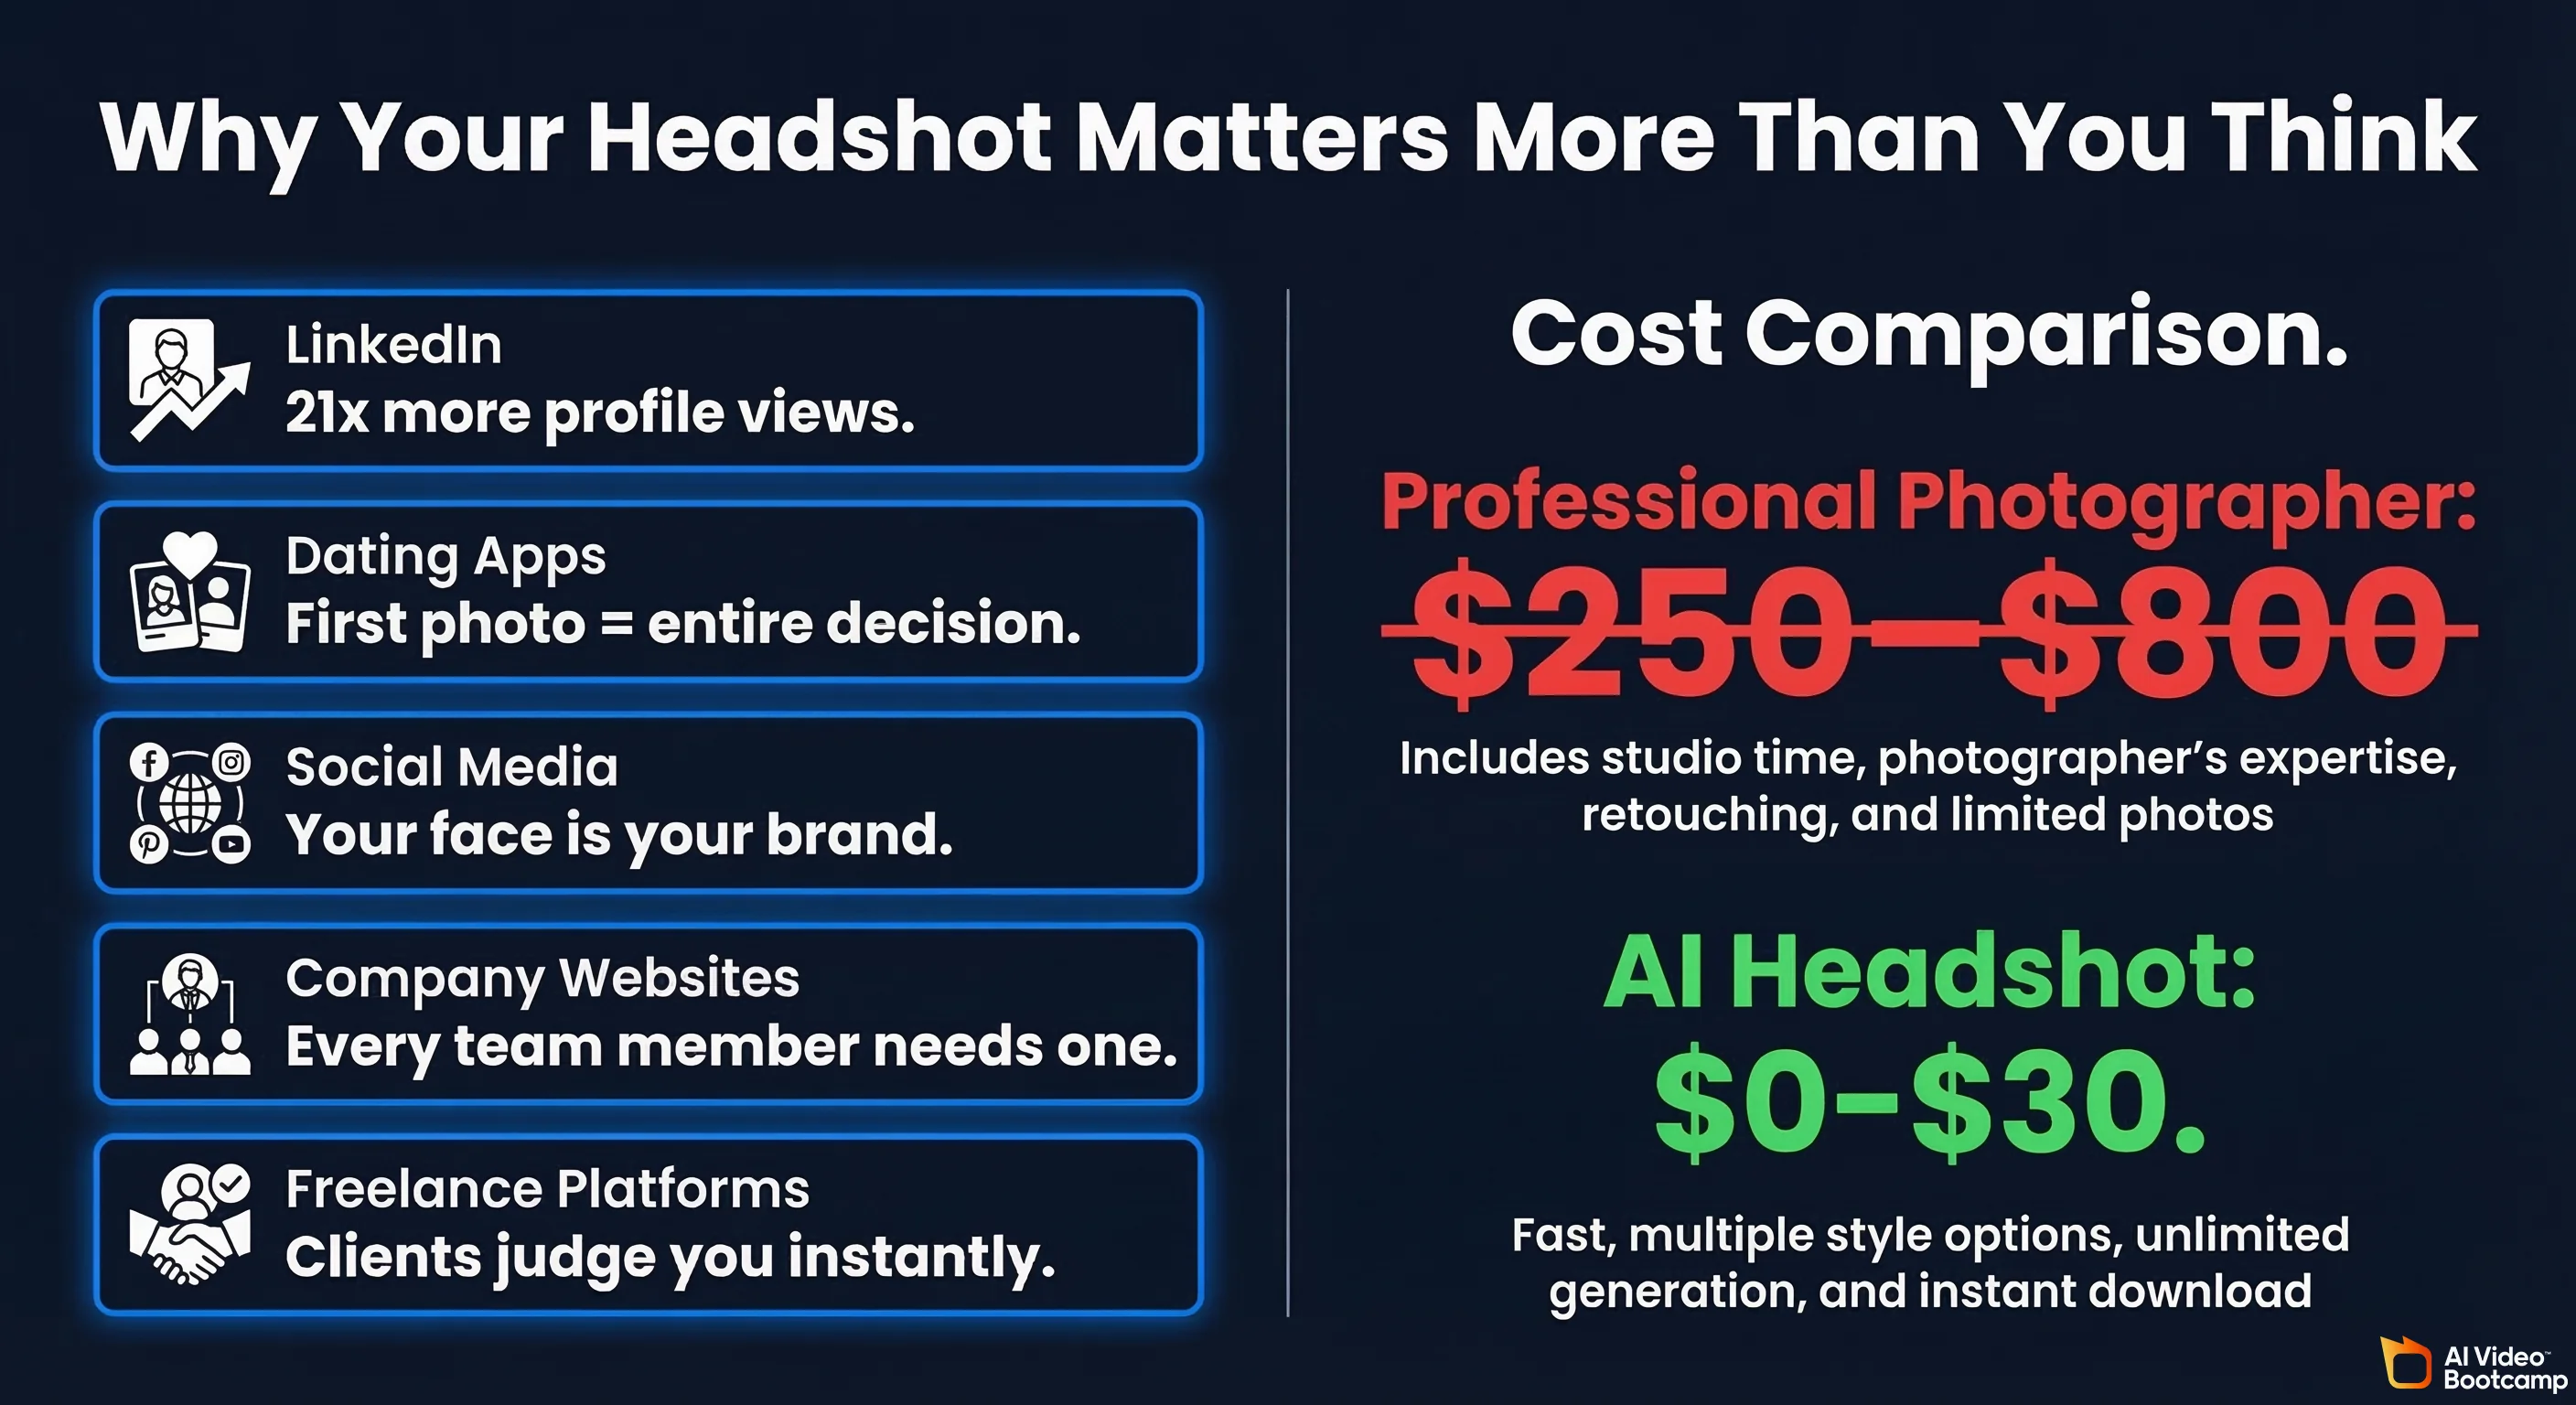
- LinkedIn — Profiles with photos get 21x more views and 9x more connection requests. That’s not a suggestion to add a photo. That’s a requirement if you want anyone to take your profile seriously.
- Dating apps — Your first photo is literally the entire decision. Hinge, Bumble, Tinder — they all live and die by that opening image. Bad lighting? Blurry selfie? You’re getting swiped left before anyone reads your witty bio.
- Social media — Instagram, TikTok, Twitter/X — your profile photo is your brand, whether you think of yourself as a “brand” or not.
- Company websites — Team pages, author bios, speaker profiles. Companies need headshots for every employee, and coordinating a group photo shoot is a logistical nightmare.
- Freelance platforms — Upwork, Fiverr, Contra. Clients absolutely judge you by your photo.
The problem? Professional headshots are expensive. The average cost of a professional headshot session in the US is around $250 according to Thumbtack. In cities like New York or San Francisco, you’re looking at $400–$800 easily. And that’s before retouching.
Meanwhile, AI tools in 2026 can generate a studio-quality headshot for somewhere between free and thirty bucks. The math is obvious.
But here’s what most people get wrong: they just type “professional headshot of me” into some random AI tool and expect magic. That’s how you end up with uncanny valley nightmares — the slightly-too-smooth skin, the weird ear, the jacket that melts into the background.
Getting AI headshots that actually look real takes a little know-how. Not a lot. But a little. And that’s exactly what this guide is for.
Best Free Option: Nano Banana Pro via Google Gemini
If you want to generate AI headshots without spending a single dollar, Nano Banana Pro (Google’s image generation model built into Gemini) is your best bet right now.
What Is Nano Banana Pro?
Nano Banana Pro is the image generation capability built into Google’s Gemini AI. It’s technically powered by Gemini 3 Pro Image, and it can both generate images from text prompts and edit existing photos. Google launched it in late 2025, and it’s been getting better rapidly.
The best part? It’s free to use through the Gemini app and website. No subscription required. You just need a Google account.
What Makes It Good for Headshots?
- It handles realistic human faces surprisingly well
- It can generate text in images accurately (useful if you want a name badge or title overlay)
- It supports up to 4K resolution
- You can upload a reference photo and ask it to generate variations
- It’s completely free at the consumer level
Step-by-Step: Creating a Headshot with Nano Banana Pro
Step 1: Open Google Gemini
Go to gemini.google.com in your browser, or open the Gemini app on your phone. Sign in with your Google account.
Step 2: Upload a Reference Photo (Optional but Recommended)
Here’s the thing about AI headshots — you can either generate a completely fictional person, or you can use a reference photo of yourself to create a headshot that actually looks like you. For a profile picture you’ll actually use, you want the second option.
Click the image upload button (the little picture icon in the chat bar) and upload a clear, well-lit selfie. Front-facing works best. Good lighting matters even for the reference — garbage in, garbage out.
Step 3: Write Your Prompt
This is where the magic happens. Don’t just say “make this a professional headshot.” Be specific. Here’s a prompt that works well:
“Using this photo as a reference for my face and features, generate a professional headshot photo. Studio lighting with a soft grey background. I’m wearing a dark navy blazer over a white shirt. The photo should look like it was taken by a professional photographer with a 85mm portrait lens. Soft bokeh in the background. Natural skin texture, no over-smoothing.”
Step 4: Review and Iterate
Gemini will generate your image. Look at it critically:
- Does the face look like you?
- Are there any weird artifacts around the ears, hair, or collar?
- Does the lighting look natural?
- Are the eyes looking in a natural direction?
If something’s off, tell Gemini what to fix: “Make the lighting warmer” or “The jawline doesn’t look quite right, make it more natural” or “Remove the slight blur on the left ear.”
Step 5: Download
Once you’re happy, click the download button on the image. You’ll get a high-resolution file ready to upload wherever you need it.
Tips for Better Results with Nano Banana Pro
- Always specify “natural skin texture” — Without this, AI tends to over-smooth skin, which is the #1 giveaway
- Mention a specific lens — “85mm portrait lens” or “70-200mm lens” tells the AI to create realistic depth of field
- Specify the background — Grey, light blue, or soft white are the safest for professional headshots
- Don’t ask for too much — Keep it simple. One person, shoulders up, clean background. The more complex you make it, the more things can go wrong
Limitations
Nano Banana Pro is great, but it’s not perfect. You might hit capacity issues during peak hours (Google’s servers get slammed). The face consistency isn’t always 100% — sometimes it’ll change subtle features between generations. And while it’s free, Google does add an invisible SynthID watermark to all AI-generated images.
Best Quality: Midjourney v7
If you want the absolute best-looking AI headshot possible and you’re willing to pay for it, Midjourney is still the king of image quality in 2026.
Pricing
Midjourney is a subscription service. Here’s what each plan costs:
| Plan | Monthly | Annual (per month) | Fast GPU Hours |
|---|---|---|---|
| Basic | $10/mo | $8/mo | ~3.3 hours |
| Standard | $30/mo | $24/mo | ~15 hours |
| Pro | $60/mo | $48/mo | ~30 hours |
| Mega | $120/mo | $96/mo | ~60 hours |
Our recommendation: The Basic plan at $10/month is plenty for headshots. You’ll get enough GPU time to generate dozens of headshot variations, which is way more than you need. If you just want a one-time headshot, subscribe for one month, generate your photos, download everything, and cancel.
Step-by-Step: Creating a Headshot with Midjourney v7
Step 1: Subscribe and Access Midjourney
Go to www.midjourney.com/home and sign up. You’ll create an account and pick your plan. Midjourney now has its own web interface (no more Discord-only access), which makes everything much simpler.
Step 2: Upload Your Reference Photo
In the Midjourney web editor, you can upload a reference image. This is crucial for getting a headshot that looks like you. Upload a clear, front-facing photo with decent lighting.
Step 3: Use the Right Prompt
Here’s where Midjourney really shines. The prompt engineering matters a lot. Here are proven prompts for different styles:
Classic LinkedIn Headshot:
“/imagine [upload your photo] professional corporate headshot, studio photography, soft directional lighting, neutral grey background, wearing navy suit and white shirt, shot on Canon EOS R5 with 85mm f/1.4 lens, shallow depth of field, natural skin texture with subtle pores visible, confident warm smile, shoulders slightly angled —ar1:1 —v 7 —s 200”
Creative Professional Headshot:
“/imagine [upload your photo] editorial portrait headshot, warm golden hour side lighting, dark blurred background, wearing a smart casual charcoal blazer, genuine relaxed expression, professional photography, Hasselblad medium format look, skin detail preserved —ar4:5 —v 7 —s 150”
Casual/Social Media Headshot:
“/imagine [upload your photo] natural portrait photo, outdoor setting with soft bokeh background, warm afternoon light, casual smart outfit — fitted white t-shirt under an open linen shirt, authentic friendly smile, candid feel but well-composed, shot on Sony A7IV 50mm f/1.8, natural colors —ar1:1 —v 7 —s 100”
Step 4: Understand the Parameters
Let me break down those weird codes at the end:
- —ar 1:1 — This sets the aspect ratio. 1:1 is square (perfect for most profile pics). Use 4:5 for LinkedIn’s preferred ratio.
- —v 7 — This tells Midjourney to use version 7, the latest and best model.
- —s 200 — This is the “stylize” parameter. Lower numbers (0–100) = more realistic. Higher numbers (200–1000) = more artistic. For headshots, stay between 100–250.
Step 5: Upscale and Download
Midjourney will generate a grid of 4 images. Pick your favorite and hit the upscale button (U1, U2, U3, or U4). This gives you a high-resolution version you can download.
Step 6: Fine-Tune with Variations
If one image is close but not perfect, use the variation button (V1, V2, V3, V4) to generate slight variations of that specific image. This is great for dialing in the exact expression or lighting you want.
Why Midjourney Produces the Best Results
Midjourney v7 excels at photorealistic imagery because it was specifically trained to understand photography concepts — lens types, lighting setups, depth of field, skin textures. When you speak to it in photography language, it delivers results that are genuinely hard to distinguish from real photos.
The tradeoff is the price tag and the slight learning curve with prompts. But for $10, you’re getting headshots that would cost you $300+ from a photographer.
Easiest Option: HeadshotPro & Remini (Upload and Done)
Not everyone wants to fiddle with prompts. Some people just want to upload a few selfies and get professional headshots back. That’s exactly what HeadshotPro and Remini are built for.
HeadshotPro
What it is: A dedicated AI headshot service. You upload selfies, pick a style, and get back 70+ professional headshots.
Pricing:
- Starts at $29 for the basic package
- Premium options run up to $59
- Team/corporate plans available for multiple people
How it works — Step by Step:
- Go to www.headshotpro.com and click “Get Started”
- Upload 10–15 photos of yourself — They want variety: different angles, different lighting, different expressions. Follow their guidelines closely (this matters more than you think)
- Choose your style — Professional, creative, casual, etc. You can also specify details like clothing color preferences and background style
- Wait — HeadshotPro says results come back in as fast as 10 minutes, though it can take up to 2 hours during busy times
- Browse your results — You’ll get 70+ headshots in different styles, outfits, and backgrounds
- Download your favorites — Pick the ones you like, download in full resolution
Pros:
- Dead simple — no prompts to learn, no settings to tweak
- Consistently good results (they’ve generated 18M+ headshots)
- Full ownership and commercial rights to your photos
- They delete your uploaded photos after 7 days and AI photos after 30 days (good for privacy)
- Money-back guarantee if you don’t get a usable headshot
Cons:
- Not free —$29 minimum
- Less control than prompt-based tools
- Results depend heavily on the quality of photos you upload
Remini
What it is: Primarily a photo enhancement app that also generates AI headshots and avatars.
Pricing:
- Free version with ads (limited features)
- Premium subscription: approximately $7/week or around $30–$40/year depending on the offer shown to you (Remini uses dynamic pricing, so your exact price may vary)
How it works — Step by Step:
- Download Remini from the App Store or Google Play (also works on remini.ai web)
- Open the app and find the AI Headshots or AI Photos feature
- Upload 8–12 selfies — Similar to HeadshotPro, variety is key
- Choose a style pack — Professional, glamour, casual, artistic, etc.
- Wait for processing — Usually takes a few minutes
- Review and save your favorites
What makes Remini special: Beyond generating headshots, Remini is incredible at enhancing existing photos. Got a blurry selfie? Remini can sharpen it dramatically. Low resolution old photo? Remini can upscale it. This makes it a great companion tool — generate your headshot elsewhere, then run it through Remini to enhance the final result.
Pros:
- Super easy to use
- Great photo enhancement capabilities
- Works on mobile (convenient)
- Free tier available (with ads)
Cons:
- Weekly pricing can add up fast ($7/week = $364/year if you forget to cancel)
- Dynamic pricing feels sketchy — different users see different prices
- AI headshot quality is good but not Midjourney-level
Photoroom (Bonus Tool)
What it is: An AI-powered photo editing app that’s especially good at background removal and replacement.
Pricing:
- Free plan — Basic features with watermark
- Pro plan — Approximately $13/month or $90/year
- Business plan — Custom pricing for teams
Why it’s useful for headshots: Photoroom isn’t primarily a headshot generator, but it’s incredibly useful for polishing AI headshots. Use it to:
- Remove and replace backgrounds cleanly
- Create consistent backgrounds across multiple headshots
- Remove unwanted objects or artifacts
- Adjust lighting and colors
- Create professional-looking team pages with matching backgrounds
Think of Photoroom as the finishing touch. Generate your headshot with Midjourney or Nano Banana Pro, then use Photoroom to perfect the background and clean up any issues.
How to Make AI Headshots Look REAL
This is the section that separates the “obviously AI” headshots from the ones that fool everyone. Pay close attention.
The Golden Rules
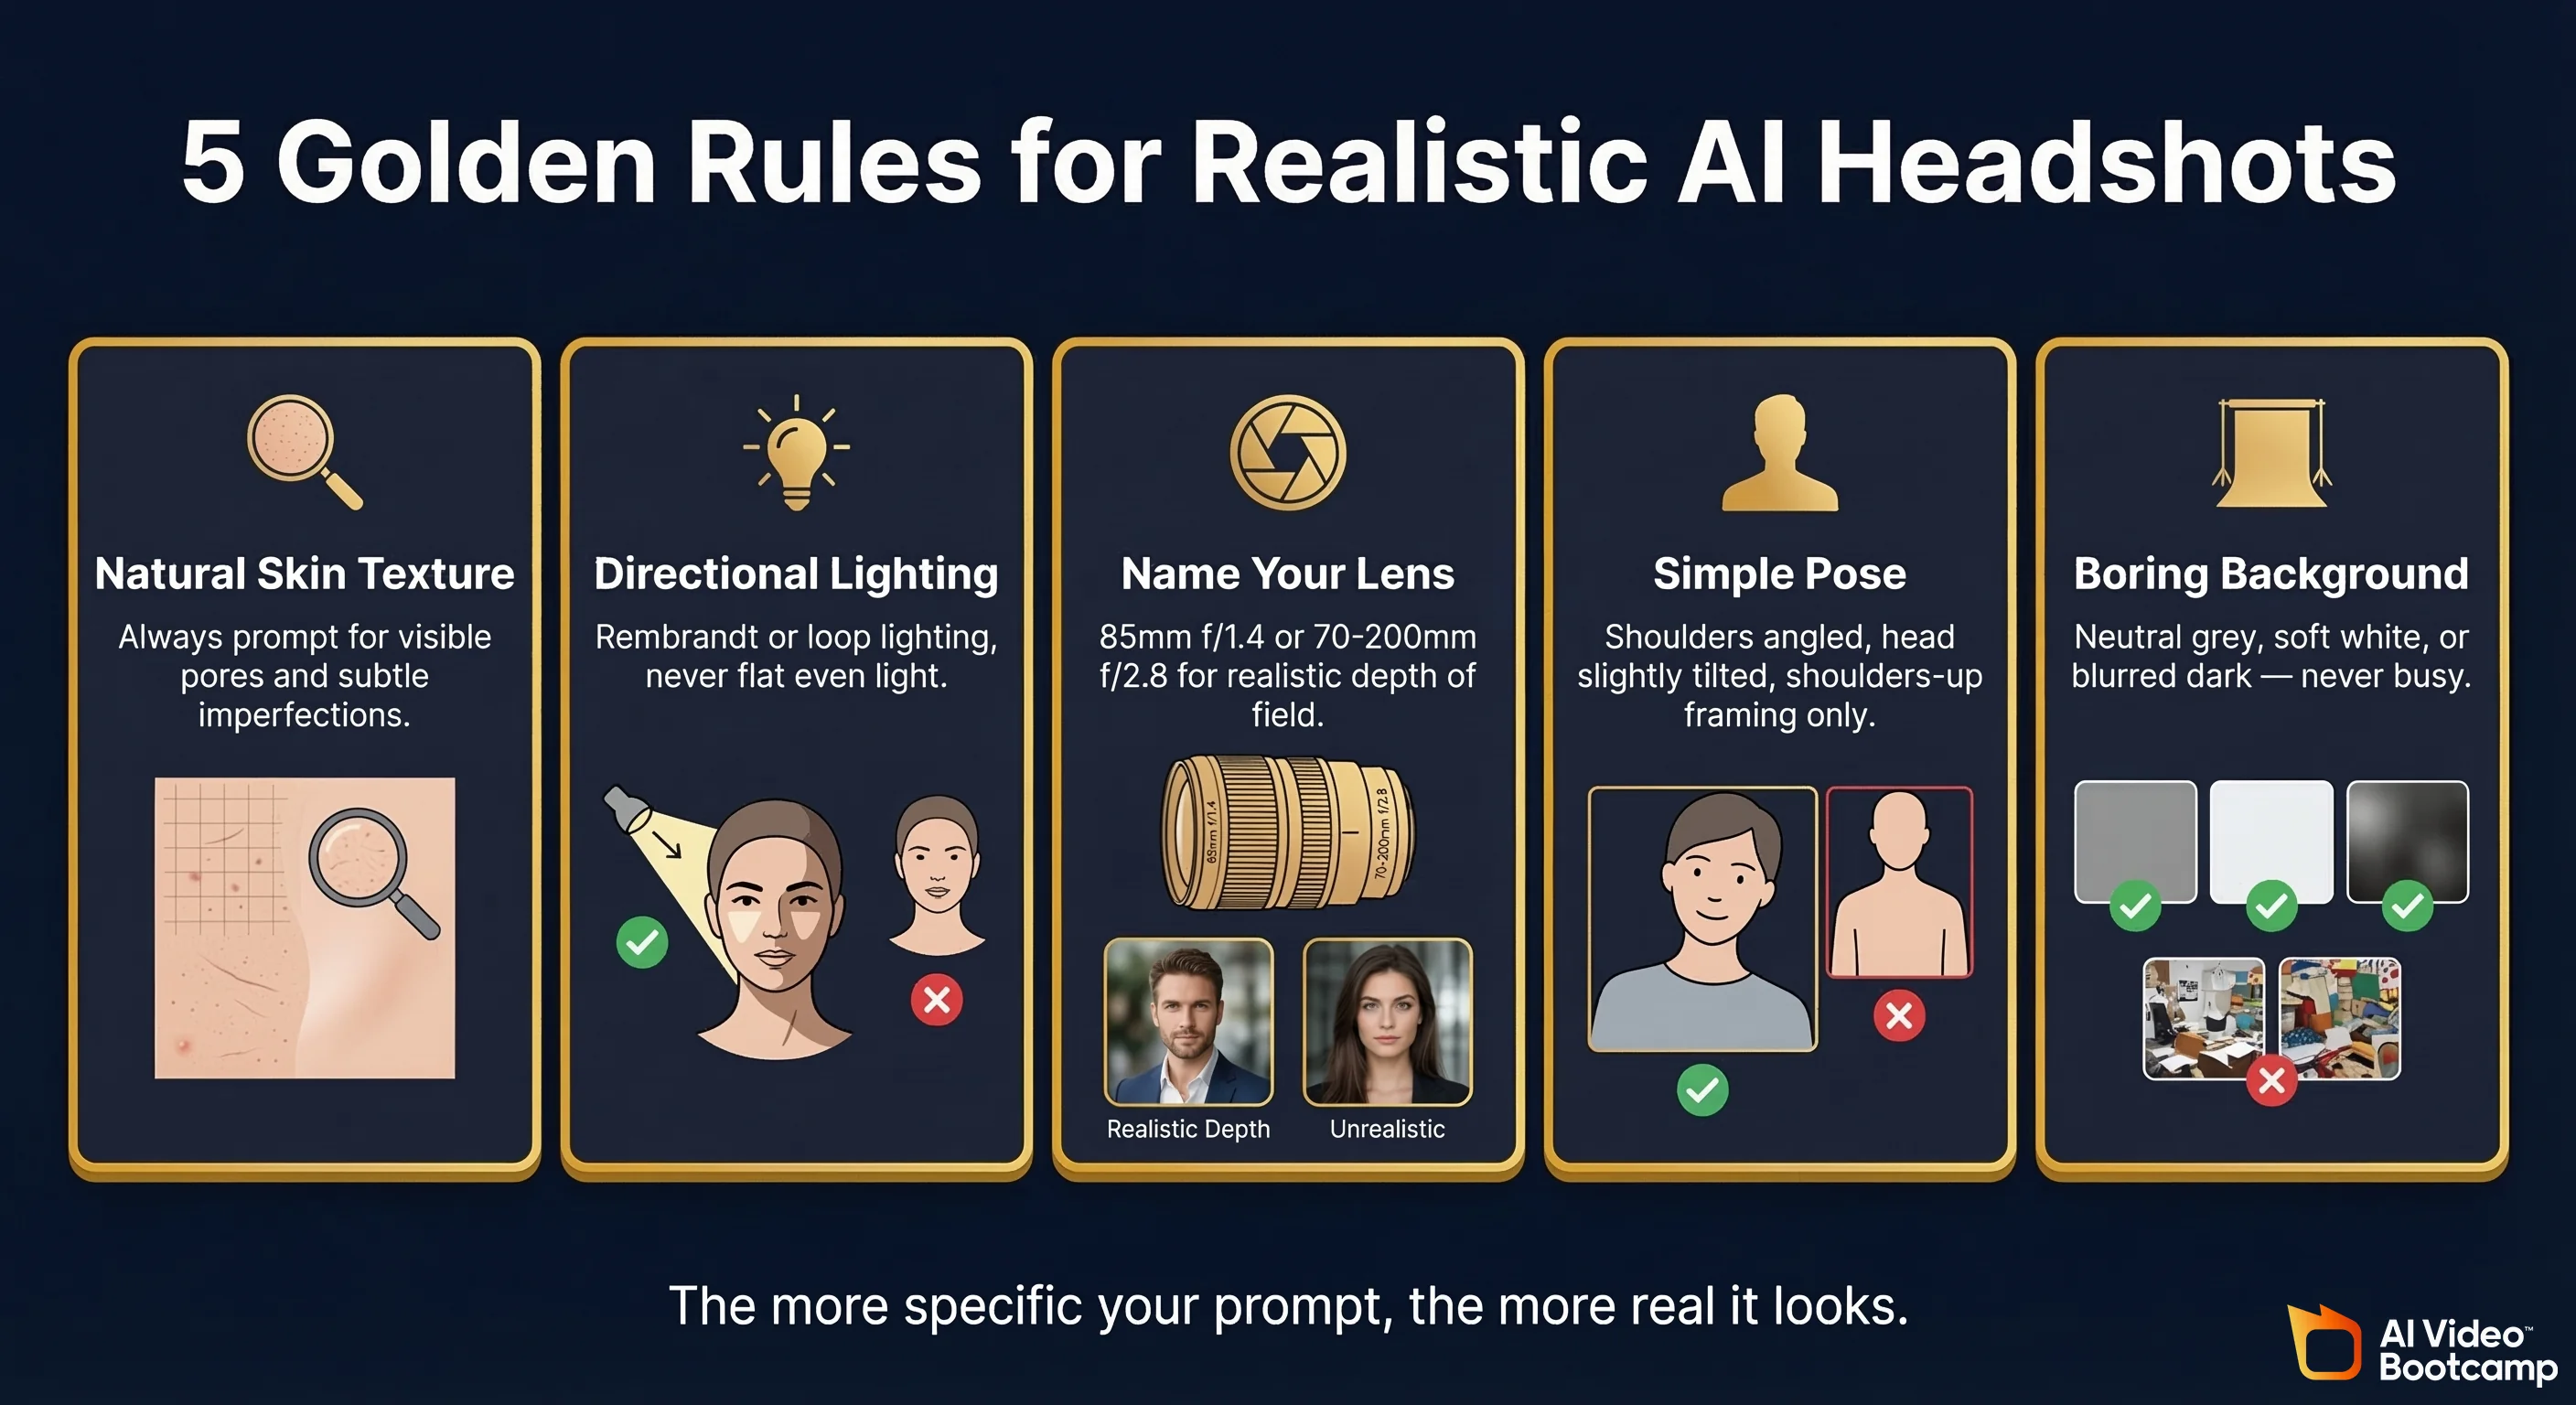
1. Always Specify Natural Skin Texture
This is rule number one. The biggest giveaway in AI headshots is skin that looks like it was airbrushed by an overeager retoucher. Real skin has pores, subtle imperfections, fine lines, and texture.
In your prompts, always include phrases like:
- “Natural skin texture with visible pores”
- “Realistic skin detail, not over-smoothed”
- “Subtle skin imperfections for realism”
2. Get the Lighting Right
Bad lighting kills realism faster than anything else. AI tools love to generate flat, even lighting that looks unnatural. Real portrait photography uses directional lighting — light coming from one main source, creating subtle shadows.
Use these lighting descriptions:
- “Soft directional lighting from the upper left”
- “Rembrandt lighting” (classic portrait lighting with a triangle of light on one cheek)
- “Loop lighting” (slightly above and to the side — the most common professional headshot lighting)
- “Natural window light from the side”
3. Mention Specific Camera and Lens Details
This sounds weird, but it works incredibly well. When you tell AI what camera and lens “took” the photo, it mimics the specific characteristics of that equipment.
- 85mm f/1.4 — The classic portrait lens. Creates beautiful, creamy background blur while keeping the face sharp
- 70-200mm f/2.8 — Another portrait favorite, slightly more compressed perspective
- Canon EOS R5, Sony A7IV, Nikon Z9 — Mentioning specific cameras helps the AI nail the color science
4. Keep the Pose Simple
The more complex the pose, the more likely something will go wrong. For headshots, stick with:
- Shoulders slightly angled to the camera (not dead straight-on)
- Head tilted very slightly
- Looking directly at camera or just slightly off-center
- Shoulders-up framing (don’t try for full body)
5. Choose Boring Backgrounds
Seriously. The more interesting your background, the more likely the AI will mess something up. Stick with:
- Neutral grey
- Soft white
- Blurred office/bookshelf (very blurred)
- Dark/black
- Soft blue gradient
What to Avoid
- Don’t ask for hands in the frame — AI still struggles with hands in 2026. Keep them out of shot.
- Don’t request complex patterns on clothing — Plaid shirts, intricate ties, and detailed jewelry create artifacts
- Don’t use overly creative prompts — “Headshot in a forest with sunbeams and butterflies” is going to look fake. Keep it simple.
- Don’t over-stylize — In Midjourney, keep the —s value under 250 for realistic headshots
- Don’t use filters or heavy edits on reference photos — Upload the most natural, unfiltered photo of yourself possible
Best Prompts for Different Use Cases
Here are ready-to-use prompts organized by what you need. Copy, paste, and adjust as needed.
LinkedIn / Corporate
“Professional corporate headshot of [describe yourself: e.g., a 30-year-old man with short brown hair and light stubble]. Studio photography with soft Rembrandt lighting. Wearing a charcoal grey suit with a light blue dress shirt, no tie. Neutral medium grey background. Shot on Canon EOS R5 with 85mm f/1.4 lens. Confident, approachable expression with a slight warm smile. Natural skin texture with visible pores. Shoulders slightly angled. Head and shoulders framing.”
Instagram / Social Media
“Natural lifestyle portrait photo of [describe yourself]. Soft golden hour backlight, outdoor café setting completely blurred in background. Wearing a casual smart outfit — fitted white t-shirt under an open linen shirt. Genuine, relaxed smile. Warm color tones. Shot on Sony A7IV with 50mm f/1.8 lens. Candid feeling but well-composed. Natural skin, no retouching look.”
Dating Apps
“Warm, natural portrait photo of [describe yourself]. Genuine happy smile showing personality. Soft warm lighting, slightly blurred natural background suggesting an outdoor restaurant or park. Casual but put-together outfit. Eye contact with camera. Photo feels candid and authentic, like a friend took it on a nice day. Shot on iPhone 16 Pro in portrait mode. Natural colors, no filter look.”
A quick note on dating app headshots: going too “professional” can backfire. People on dating apps are specifically suspicious of overly polished photos. You want to look good but approachable — like a friend with a good phone took a flattering candid. That’s the sweet spot.
Business Website / Speaker Profile
“Editorial portrait headshot of [describe yourself]. Professional but creative feel. Dark, moody background with subtle gradient. Dramatic but flattering side lighting. Wearing a dark blazer. Confident, authoritative expression — slight smile but not overly friendly. Shot on Hasselblad X2D with 80mm lens. Rich colors, deep contrast. Natural skin detail preserved.”
Real Estate / Client-Facing
“Friendly professional headshot of [describe yourself]. Bright, warm lighting. Clean white or light blue background. Wearing a professional but approachable outfit — blazer with open collar. Warm, trustworthy smile. Shot on Canon 5D Mark IV with 70-200mm f/2.8 lens. Clean, high-key lighting. Welcoming expression that conveys trustworthiness and competence.”
Creative Professional / Designer / Artist
“Modern creative portrait of [describe yourself]. Contemporary feel with interesting but not distracting lighting — maybe a subtle color gel creating a faint blue or amber accent. Dark background. Smart casual outfit, maybe a black turtleneck. Artistic but still professional. Shot on Fujifilm GFX 100S. Slight film grain for character. Natural pose, authentic expression.”
Common Mistakes (And How to Fix Them)
The Uncanny Valley Problem
The “uncanny valley” is that creepy feeling you get when something looks almost human but not quite. In AI headshots, it shows up as:
-
Too-perfect symmetry — Real faces are asymmetrical. If your AI headshot looks perfectly symmetrical, it reads as fake.
- Fix: Add “slight natural facial asymmetry” to your prompt
-
Dead eyes — The eyes have no life, no catch light (that little white reflection that makes eyes look alive)
- Fix: Specify “natural catch light in eyes” or “lively, engaged eye expression”
-
Wax figure skin — Smooth, poreless, plastic-looking skin
- Fix: Always include “natural skin texture with visible pores and subtle imperfections”
Lighting Disasters
-
Flat lighting — No shadows, no dimension. Makes the face look like a pancake.
- Fix: Always specify directional lighting with a specific direction
-
Multiple light sources — Shadows going in different directions, which is physically impossible with one sun
- Fix: Keep it simple. One main light source, maybe a subtle fill light
-
Rim lighting overkill — A glowing outline around the head like a halo
- Fix: If you mention rim lighting, add “subtle” before it
The Weird Hands Problem
Even in 2026, AI still sometimes struggles with hands. If hands appear in your headshot:
- Extra fingers
- Fingers merging together
- Hands that look like they belong on a different body
- Weirdly bent wrists
The solution is simple: don’t include hands. Frame your headshot from the shoulders up, and specify “head and shoulders framing only.” Problem solved.
Clothing and Accessory Glitches
- Collar inconsistencies — One side of a collar looks different from the other
- Earring issues — Mismatched, floating, or partially embedded earrings
- Glasses problems — Reflections that don’t make sense, frames that melt into skin
- Tie knots — Often look physically impossible
Fix: Keep clothing simple. Solid colors, minimal accessories. If you wear glasses, be explicit about the style and mention “properly fitting glasses with realistic reflections.”
Background Bleeds
Sometimes the AI “bleeds” the subject into the background, especially around hair edges. Flyaway hairs get merged with the background, or the background color seeps into the outline of the person.
Fix: Use high-contrast backgrounds (dark subject, light background, or vice versa). Avoid backgrounds that are similar in color to hair or clothing.
Free vs. Paid: What Should You Actually Use?
Here’s a straightforward comparison to help you decide:
| Feature | Nano Banana Pro (Google Gemini) | Midjourney v7 | HeadshotPro | Remini | Photoroom |
|---|---|---|---|---|---|
| Price | Free | $10–$120/mo | $29–$59 one-time | ~$7/week or $30–40/yr | Free–$13/mo |
| Best For | Quick, free headshots | Highest quality results | Easiest experience | Photo enhancement + headshots | Background editing & polish |
| Skill Needed | Low–Medium | Medium | None | None | Low |
| Quality | ★★★★☆ | ★★★★★ | ★★★★☆ | ★★★☆☆ | N/A (editing tool) |
| Realism | Very good | Excellent | Very good | Good | N/A |
| Speed | Instant | 1–2 minutes | 10 min–2 hours | Minutes | Instant |
| # of Results | One at a time | 4 per prompt | 70+ per session | Varies by style pack | N/A |
| Uses Your Face | Yes (with upload) | Yes (with reference) | Yes (uploads required) | Yes (uploads required) | Yes (editing only) |
| Privacy | Google stores data | Images on Midjourney servers | Deleted within 30 days | Standard app data policies | Standard app data policies |
Our Recommendations by Situation
“I just need ONE good LinkedIn headshot and I don’t want to pay anything” → Use Nano Banana Pro via Google Gemini. Upload a selfie, use our LinkedIn prompt from above, iterate until you’re happy.
“I want the absolute best results and I’m willing to spend a little” → Get the Midjourney Basic plan ($10/month). Generate your headshots, download everything, cancel after a month. Best $10 you’ll spend.
“I’m not technical at all and just want to upload selfies and get headshots back” → HeadshotPro ($29). Upload photos, pick a style, get 70+ headshots. Done.
“I already have a decent headshot but it needs to be better” → Remini for enhancement + Photoroom for background work. Use the free tiers first.
“I need headshots for my whole team” → HeadshotPro’s team plans. Consistent style across all team members, which looks way more professional than everyone having different photo styles.

How to Tell If a Headshot Is AI (And How to Avoid Detection)
Let’s be real: some of you reading this are worried people will know your headshot is AI-generated. Fair concern. Here’s what gives AI headshots away and how to avoid each tell.
The Telltale Signs
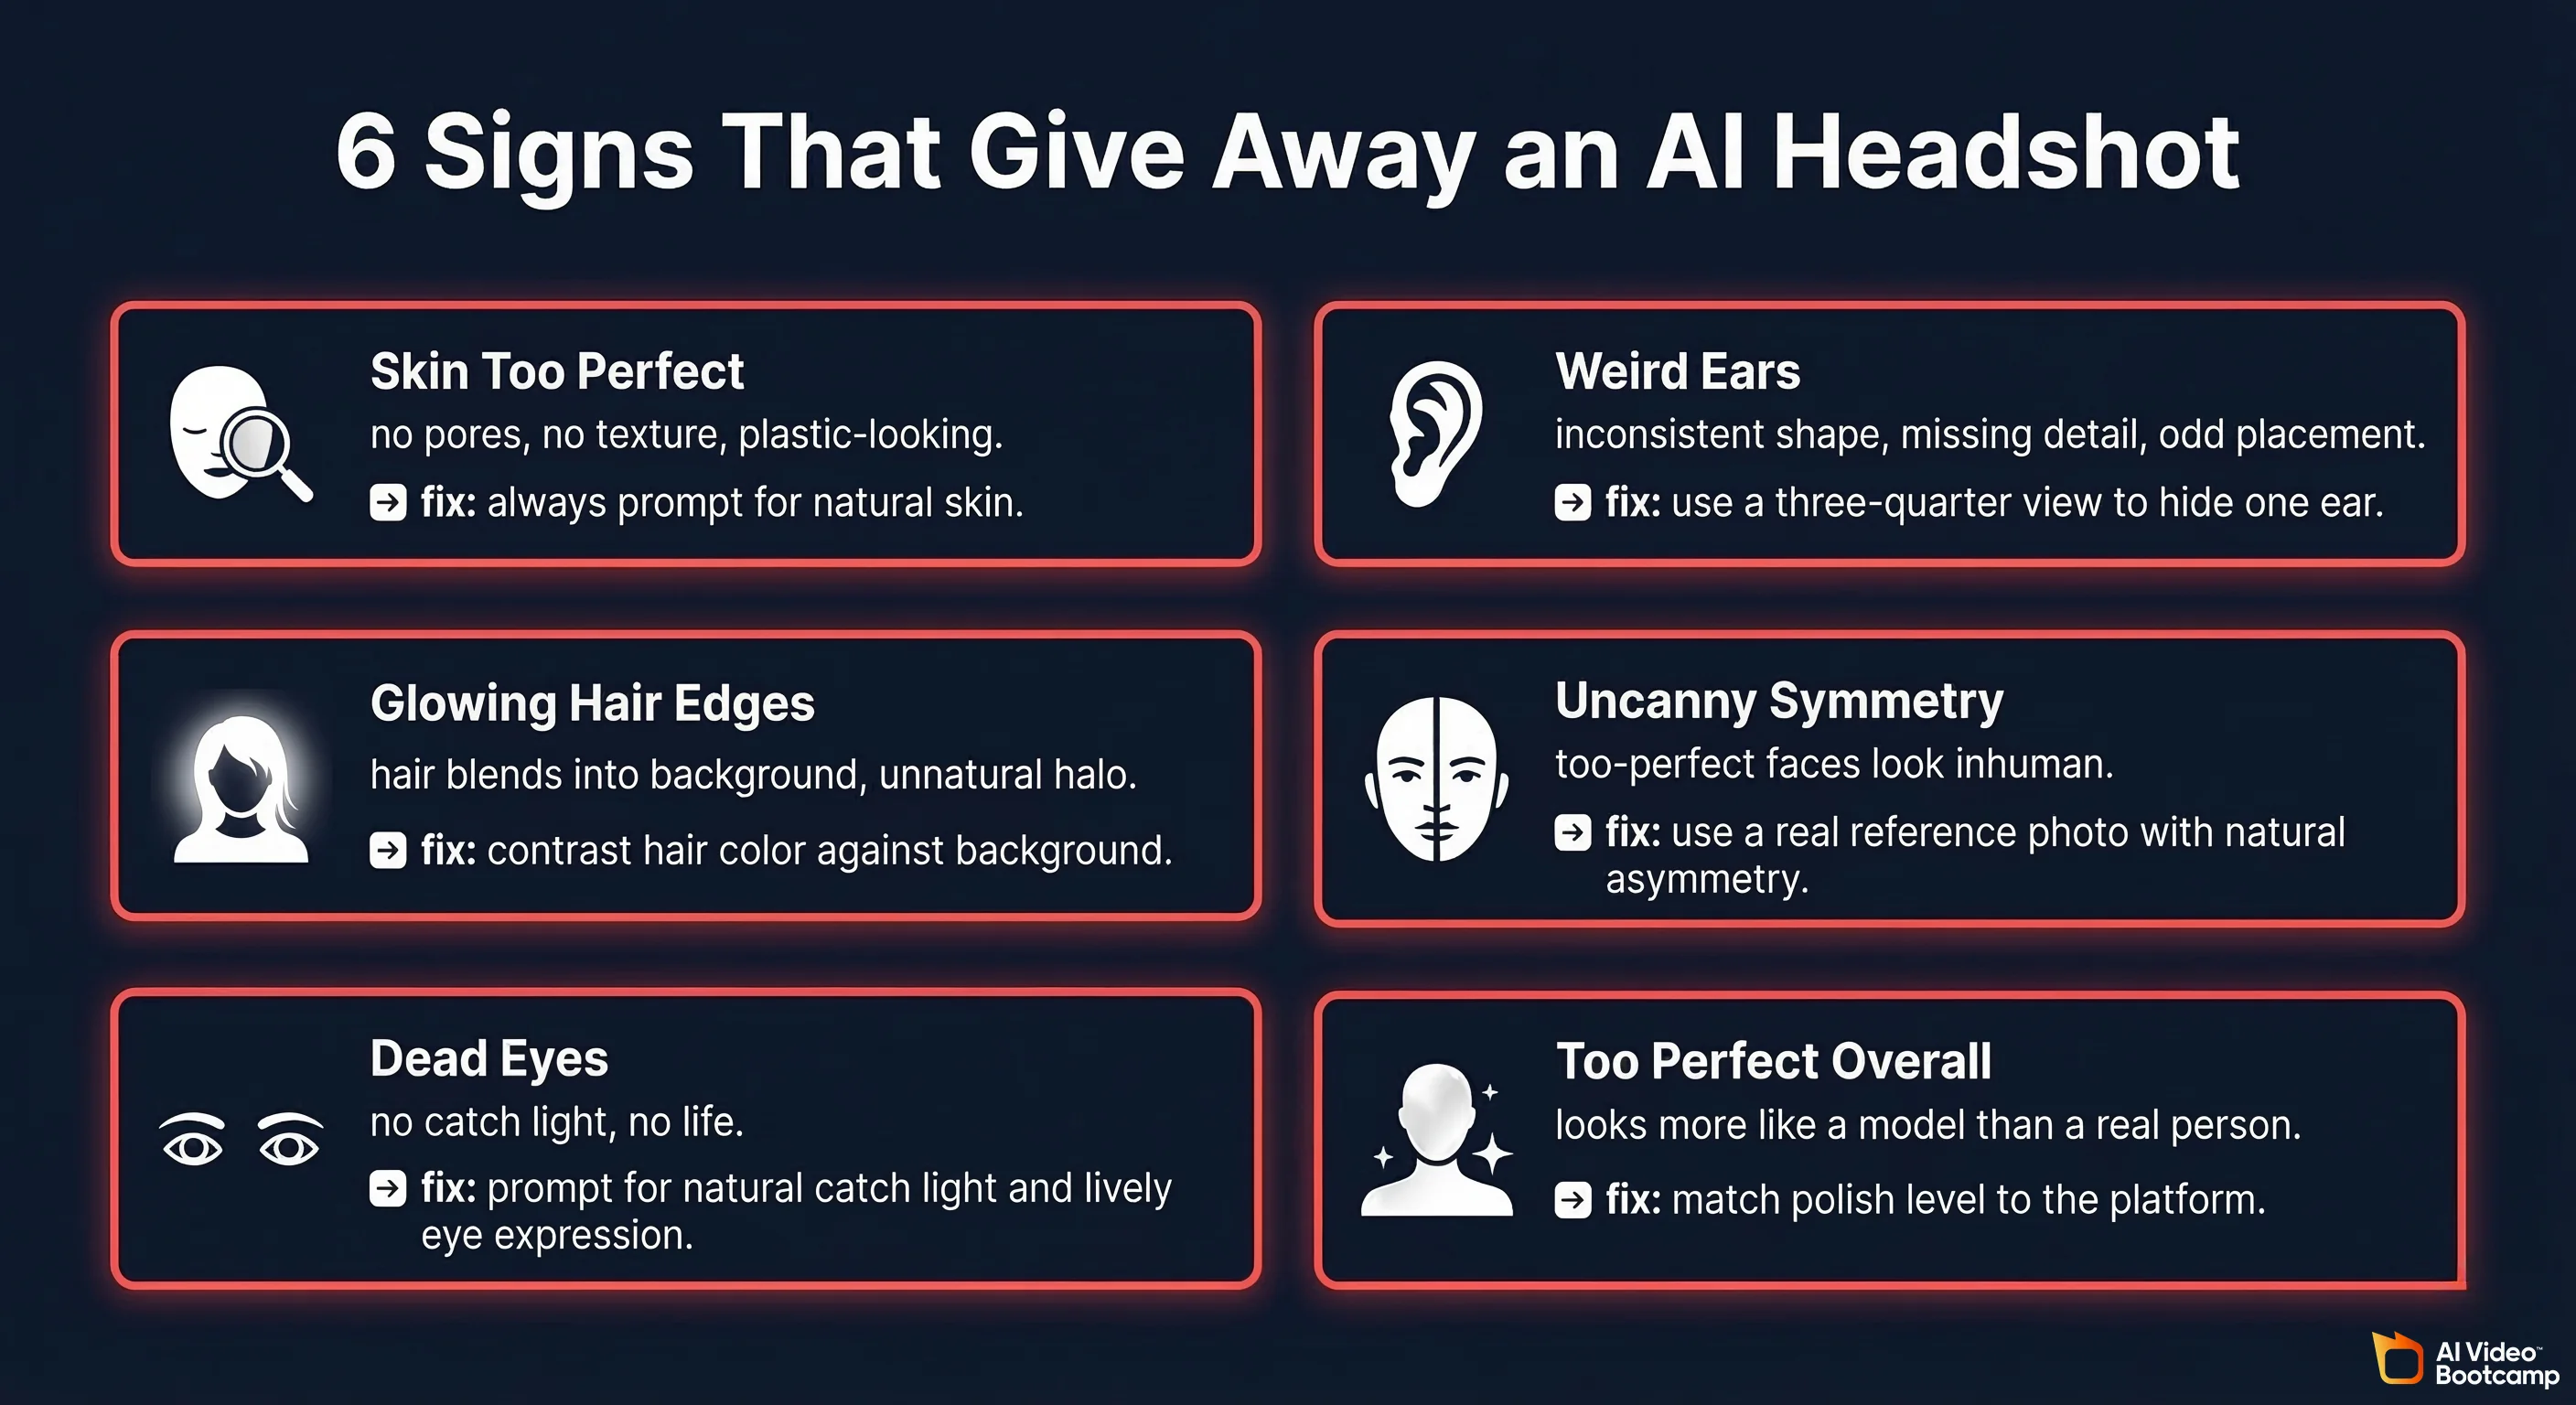
1. Skin That’s Too Perfect
This is the #1 giveaway. AI tends to generate skin that looks like it’s been through ten rounds of Facetune. No pores, no texture, no subtle imperfections. Real skin has character — tiny lines, occasional spots, visible pores, slight color variation.
How to avoid it: Always prompt for natural skin texture. After generating, zoom in to 100%. If you can’t see any pores or texture, it’s too smooth. Regenerate with stronger natural texture prompts.
2. Inconsistent Ear Details
AI often struggles with ears. They might be slightly different shapes, missing interior detail, or positioned weirdly on the head. Most people don’t look closely at ears, but photographers and anyone who’s spent time looking at AI images will notice.
How to avoid it: Generate headshots where one ear is hidden (three-quarter view). If both ears show, zoom in and check them carefully.
3. Hair Edges That Don’t Make Sense
Where hair meets the background is a notoriously hard area for AI. You might see:
- Hair that’s too perfectly defined (real hair has flyaways)
- Hair that blends into the background
- A subtle “glow” or halo around the hair line
How to avoid it: Use a background color that contrasts well with your hair. Dark hair? Light background. Light hair? Darker background. And prompt for “natural flyaway hairs at the edges.”
4. The Symmetry Tell
Pull out your phone and try this: take a selfie, then flip it horizontally. Your face looks weirdly different, right? That’s because real faces are asymmetrical. AI often generates faces that are too symmetrical, and it triggers an unconscious “something’s off” reaction.
How to avoid it: Use a real reference photo (which has your natural asymmetry). Prompt for “natural slight asymmetry.”
5. Metadata and Watermarks
This is the technical one. AI-generated images often lack the EXIF metadata that real camera photos have (camera model, aperture, ISO, date taken). Some AI tools also embed invisible watermarks — Google’s SynthID for Nano Banana Pro images, for example.
How to avoid detection on this front:
- Download your AI headshot
- Open it in any basic photo editor (even your phone’s built-in editor)
- Make a small crop or adjustment
- Save as a new file
This strips most metadata and can disrupt some watermarking. Note: this won’t defeat sophisticated detection tools, but it handles the casual checks.
6. The “Too Good” Problem
Ironically, one of the biggest giveaways is that AI headshots sometimes look too professional. If your LinkedIn has been a cropped photo from your cousin’s wedding for three years and suddenly you have a studio-quality headshot, people notice.
How to avoid it: Match the level of polish to what’s normal for you and the platform. For dating apps, go slightly more casual. For LinkedIn, professional is expected, so a good headshot won’t raise eyebrows.
A Note on Ethics
Look, let’s address the elephant in the room. Is it “lying” to use an AI headshot?
Our take: it depends on context.
For LinkedIn or business — an AI headshot that looks like you (same general appearance, just better lighting and a nicer outfit) is no different from hiring a photographer and a stylist. You’re presenting a polished version of yourself. That’s expected and normal.
For dating apps — this gets ethically murkier. If your AI headshot makes you look like a completely different person, that’s catfishing. Research shows AI is already raising authenticity concerns in dating. But if it’s essentially you with better lighting and a cleaner background? That’s the same thing everyone does with filters.
The line is: does the AI headshot represent what you actually look like? If someone met you in person and felt misled, you went too far.
The Workflow We Recommend
After testing all of these tools extensively, here’s the workflow that consistently produces the best results:
For Maximum Quality (20 minutes, $10)
- Subscribe to Midjourney Basic ($10/month)
- Upload your best selfie as a reference
- Use the LinkedIn or appropriate prompt from this guide
- Generate 4–5 batches (16–20 images total)
- Pick your top 3 favorites
- Run them through Photoroom (free tier) to perfect the background
- Run the final result through Remini (free with ads) for a subtle enhancement pass
- Cancel Midjourney if you don’t need it anymore
For Zero Budget (15 minutes, $0)
- Open Google Gemini (free)
- Upload your selfie
- Use the appropriate prompt from this guide, adapted for Nano Banana Pro
- Generate 5–8 variations
- Pick your favorite
- Run it through Photoroom free tier for background cleanup
- Done
For Zero Effort ($29)
- Go to HeadshotPro
- Upload 10–15 selfies following their guidelines
- Wait 10 minutes to 2 hours
- Browse 70+ results
- Download your favorites
- Done
Final Thoughts
AI profile pictures and headshots in 2026 are legitimately impressive. The technology has reached a point where — with the right tool and the right prompts — you can generate headshots that are genuinely indistinguishable from professional photography for most practical purposes.
The key takeaways:
-
Free is surprisingly good now. Nano Banana Pro through Google Gemini is legitimately competitive with paid options.
-
Midjourney is still king for quality if you’re willing to learn basic prompting and spend $10.
-
HeadshotPro is the simplest if you just want to upload selfies and get results without any learning curve.
-
The details matter. Natural skin texture, proper lighting descriptions, specific lens mentions, and simple backgrounds are what separate “obviously AI” from “wait, is that real?”
-
Keep it honest. Use AI to present the best version of you, not a fictional version of someone else.
Now stop reading and go make your headshot. Your LinkedIn profile is waiting.
Have questions about AI image generation? Check out our other guides at aivideobootcamp.com.