
Pricing verified April 30, 2026.
AI Video Upscaling
faq:
- question: “How do you AI upscale video?” answer: “The fastest method: open CapCut Desktop, import your video, click Video > Basic > Enhance Quality, select your target resolution (up to 4K), and export. For higher quality, use Topaz Video AI ($299/year) with the Astra model for AI-generated video or Proteus for camera footage. For free maximum quality, install SeedVR2 v2.5 in ComfyUI (requires 8GB VRAM GPU). Always start with the highest quality source file, because upscaling cannot add detail that was never captured.”
- question: “How do you enhance AI video quality?” answer: “Three steps. First, generate at the highest native resolution your tool supports (Kling 3.0 Professional mode, Veo 3.1 quality mode). Second, upscale the output using Topaz Video AI Astra model or CapCut free. Third, post-process with color grading in CapCut or DaVinci Resolve, add audio via ElevenLabs, and export with H.265 codec at the highest bitrate your platform allows. The biggest quality gain comes from better source generation, not better upscaling.”
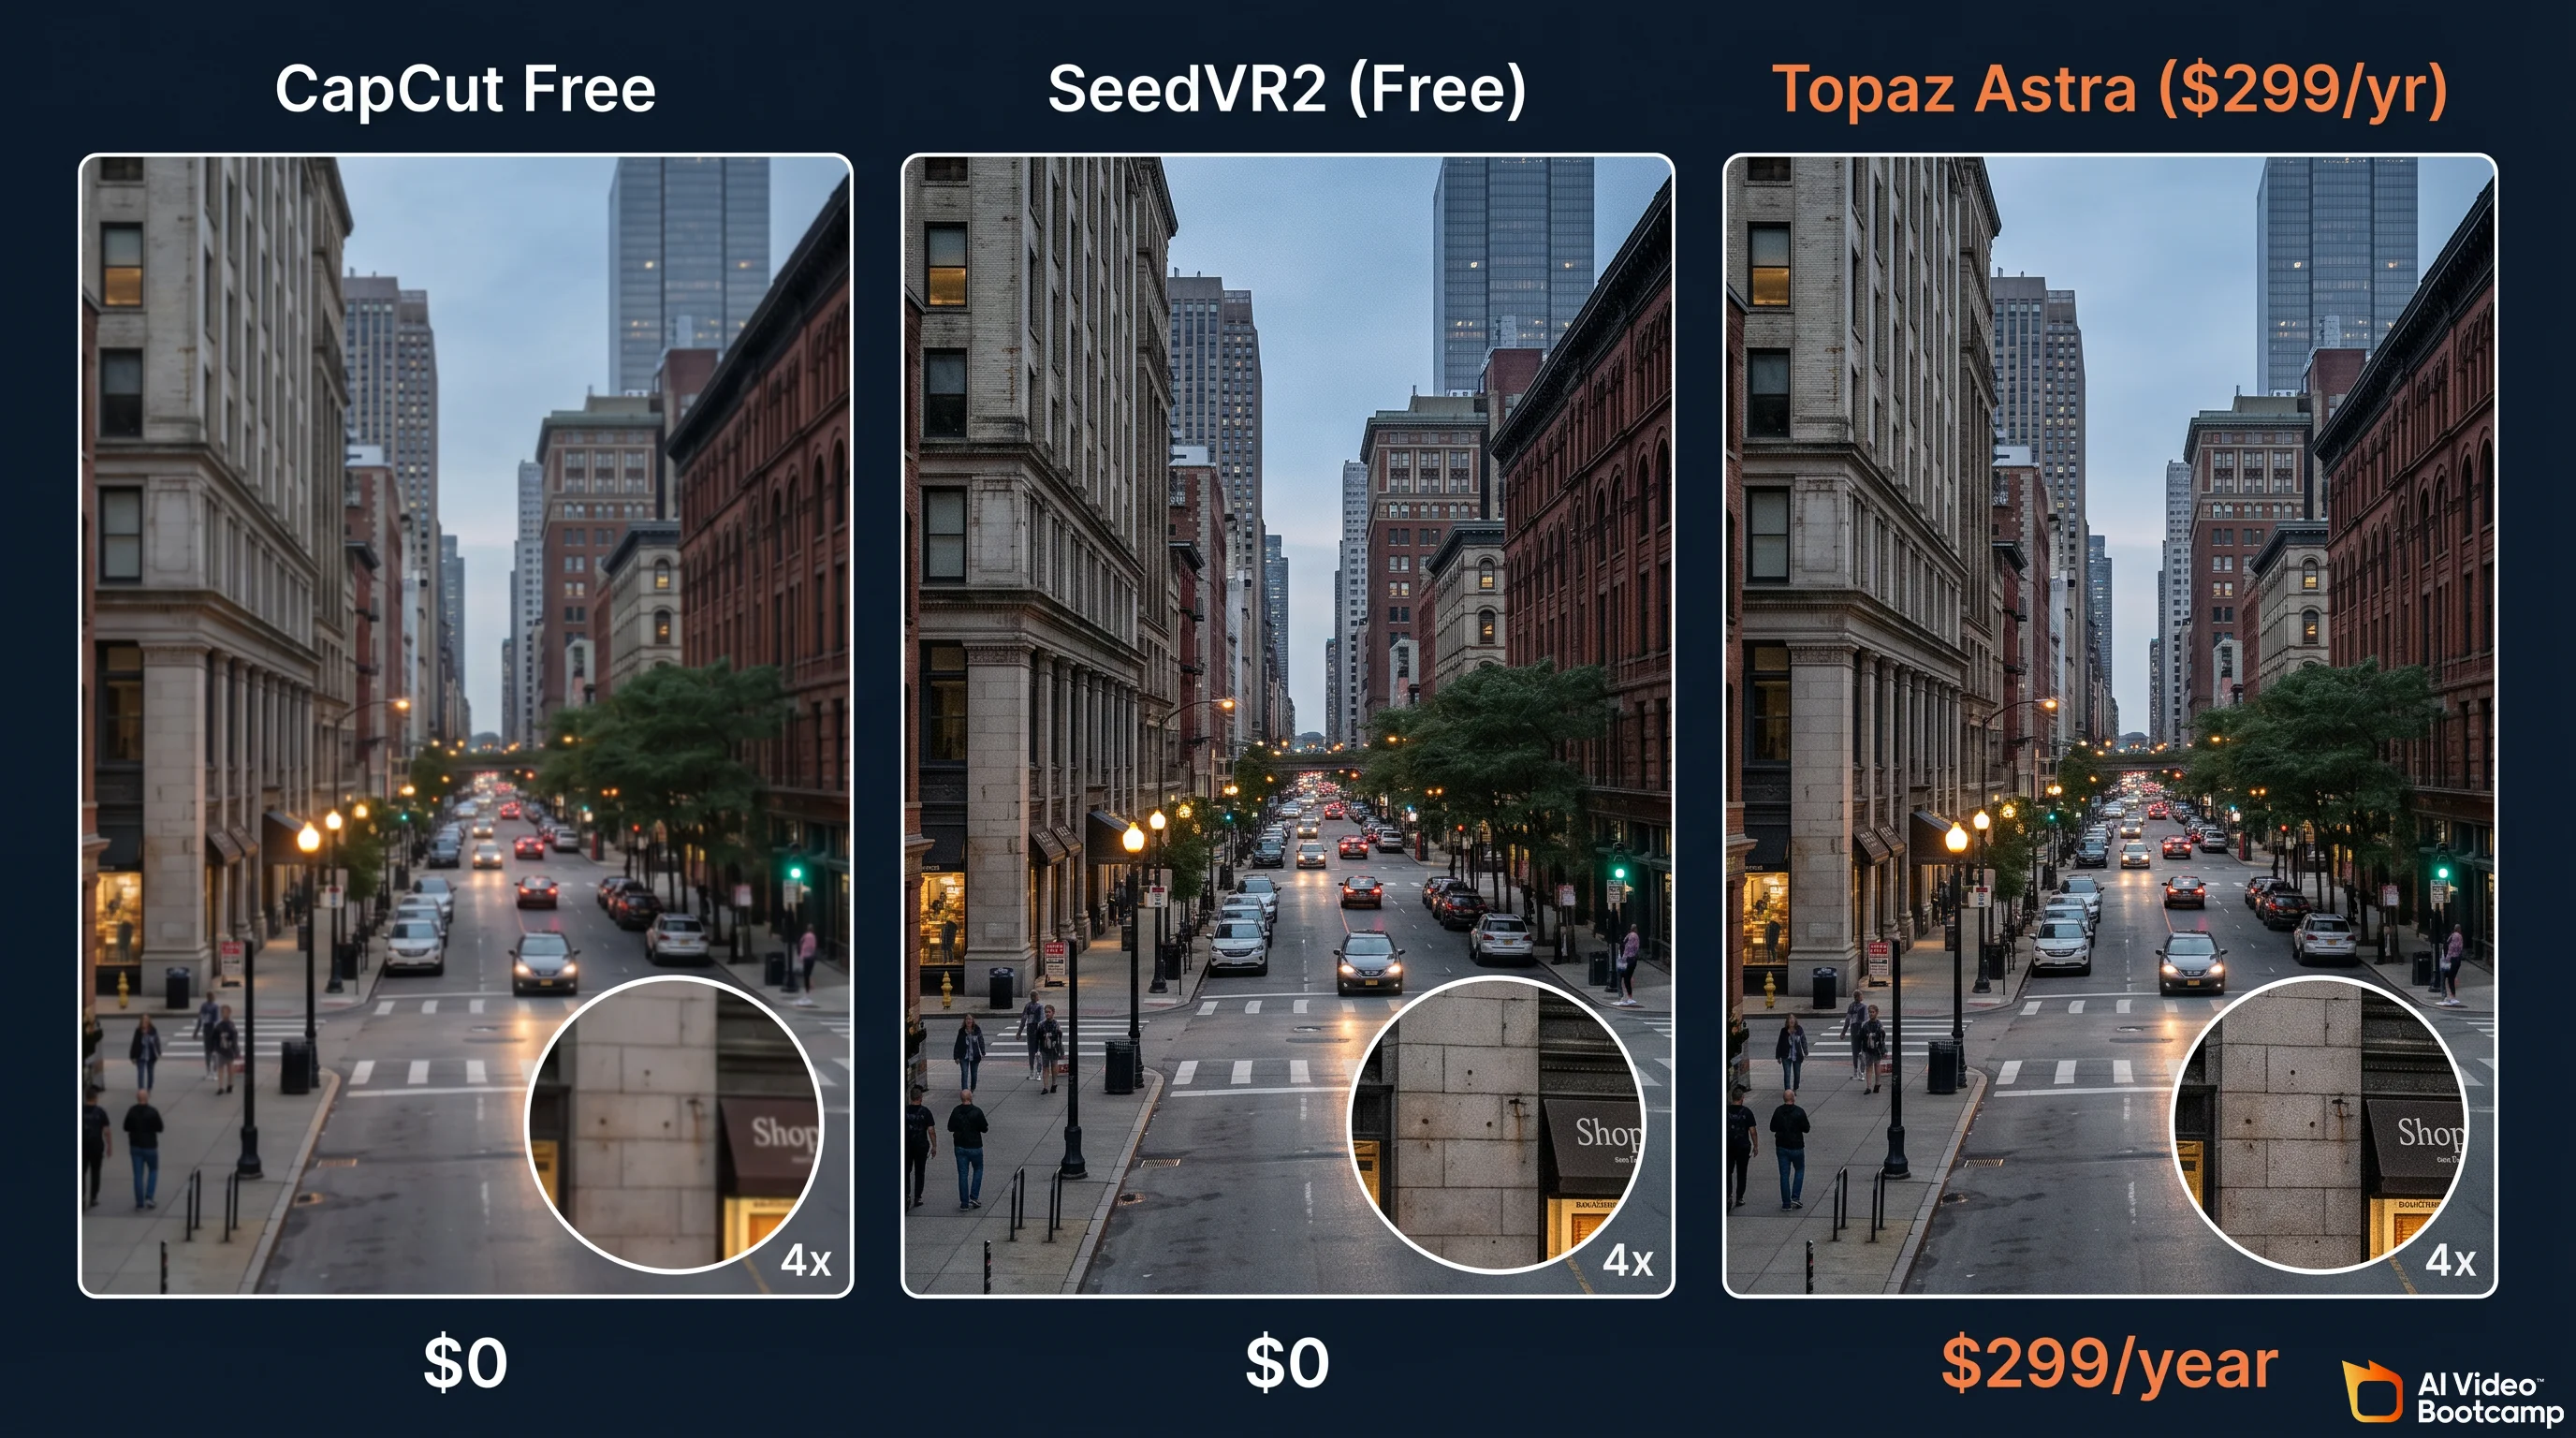
- question: “Is Topaz Video AI worth the $299 per year?” answer: “Yes, if you regularly upscale 5+ videos per month and need maximum quality. Topaz offers 19 AI models including Astra (built specifically for AI-generated content), supports up to 16K output, and remains the industry benchmark. At $299/year, it costs about $25/month. Not worth it if you only upscale occasionally (use CapCut free), lack a dedicated GPU (processing will be painfully slow), or your content is social-media-only where phone screens hide quality differences. Alternative: UniFab at $319.99 one-time offers comparable quality with faster processing.”
- question: “What is the best free AI video upscaler in 2026?” answer: “For beginners, CapCut Desktop offers one-click AI upscaling to 4K at no cost. For maximum free quality, SeedVR2 v2.5 is the best open-source option: it uses single-step diffusion, runs on 8GB VRAM GPUs, and integrates with ComfyUI. Video2X is another strong free option that wraps multiple upscaling engines (Waifu2X, ESRGAN, Anime4K) into one interface. The tradeoff with all free tools is processing speed: expect 5-10x slower rendering compared to paid options like Topaz or UniFab.”
- question: “Should you upscale before or after converting an image to video?”
answer: “Both. Upscale your source image to 4K first using NanoBanana PRO (requires Gemini Advanced, about $20/month) before feeding it into Kling or Veo for image-to-video conversion. Then upscale the video output with Topaz Astra or CapCut. Starting with a high-resolution source image gives the video model more detail to work with, resulting in cleaner motion and fewer artifacts. Skipping the image upscale step is the most common mistake AI creators make.”
howTo:
totalTime: “PT15M”
estimatedCost: “0-299”
tool:
- “CapCut Desktop (free)”
- “Topaz Video AI ($299/year, optional)”
- “NanoBanana PRO (Gemini Advanced ~$20/month, optional)” supply:
- “AI-generated video file (from Kling, Veo, or Seedance)”
- “GPU with 4GB+ VRAM (recommended)” steps:
- name: “Generate at maximum native resolution” text: “Use Kling 3.0 Professional mode, Veo 3.1 quality mode, or Seedance 2.0 at the highest resolution setting available. Include ‘sharp focus’ and ‘4K resolution’ in your generation prompt. Generate 8-12 variations and select the sharpest output before proceeding.”
- name: “Import into your upscaler” text: “Open CapCut Desktop (free) or Topaz Video AI ($299/year). In CapCut, go to Video > Basic > Enhance Quality. In Topaz, select the Astra model for AI-generated content or Proteus for camera footage.”
- name: “Set output resolution and codec” text: “Target 4K (3840x2160) for YouTube or professional use, 1080p for social media. Use H.265 codec with the highest bitrate your platform supports. Avoid re-encoding more than once to prevent compression stacking.”
- name: “Process and export” text: “Click enhance/export and wait for processing. CapCut processes in seconds, Topaz takes 15-40 minutes per 60-second clip depending on your GPU. Review the output at 100% zoom before publishing.”
- name: “Optional post-processing” text: “Apply a subtle color grade in CapCut or DaVinci Resolve. Add voiceover via ElevenLabs if needed. Export the final file with H.265 codec at maximum quality.”
Why AI Video Quality Is a Bigger Problem Than You Think
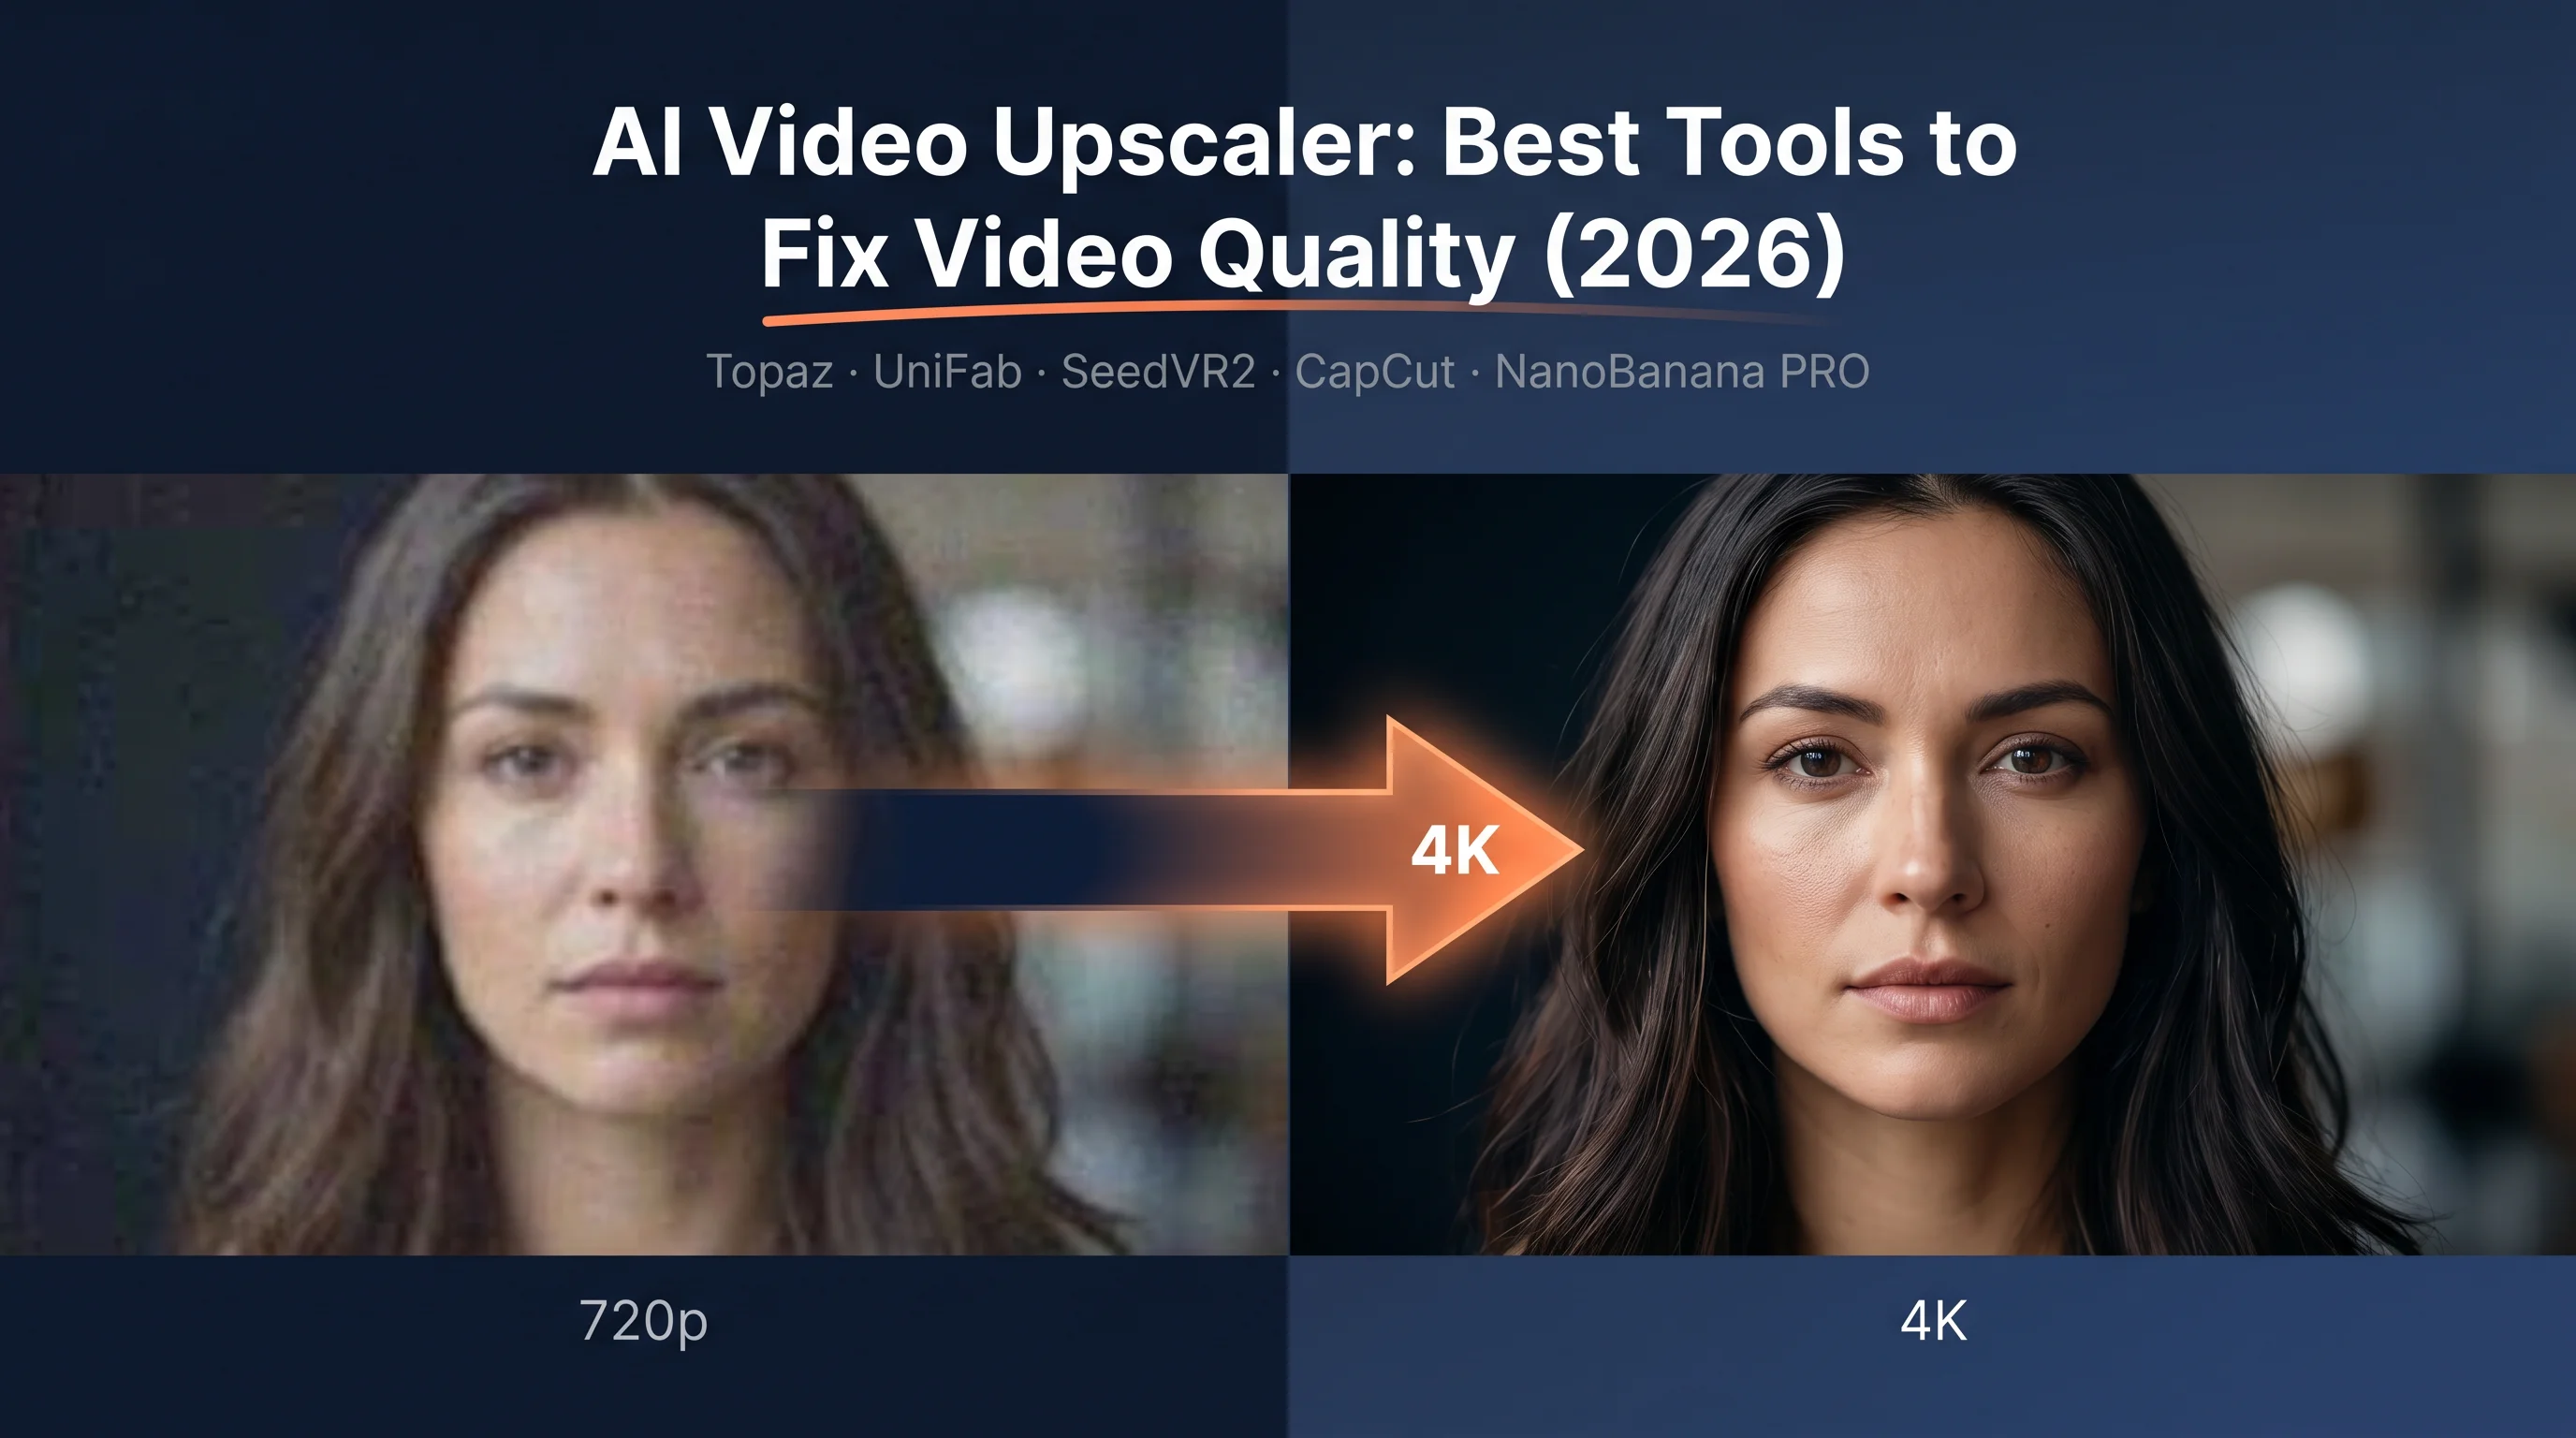
Every AI video generator in 2026, from Kling 3.0 to Veo 3.1 to Seedance 2.0, shares the same dirty secret: their raw output looks worse than your phone camera. Most AI-generated videos cap at 720p-1080p, come loaded with compression artifacts, temporal flickering, and a “waxy” look that screams synthetic. The AI video enhancer market hit $131 million in 2024 and is projected to reach $1.17 billion by 2032 (37.1% CAGR) because this problem is universal. This guide gives you the complete pipeline to fix it: from choosing the right AI video upscaler to building a workflow that produces 4K output indistinguishable from native footage.
The gap between “AI-generated” and “production-ready” is where most creators lose their audience. A 2025 IntelMarketResearch study found that AI upscaling tools deliver 78% greater efficiency than traditional methods. Yet 51% of video marketers using AI tools still publish at native resolution because they don’t know these tools exist. The AI video upscaling software market is growing at 22.1% CAGR through 2033, with North America alone representing $3.3 billion in market share. Meanwhile, cloud-based upscaling solutions now hold 62% market share, meaning most of this processing does not even require a powerful local machine. SME adoption of AI video tools grew 28% in 2024 alone. You have options at every price point, from the complete list of free AI video tools to professional suites, and this article covers all of them.
What AI Video Upscaling Actually Does (And What It Cannot Do)
AI video upscaling uses generative super-resolution to increase the physical pixel dimensions of a video file. Unlike old bicubic or nearest-neighbor scaling that simply duplicated existing pixels (producing blurry, blocky results), modern AI upscalers use deep learning to predict and reconstruct missing micro-details pixel by pixel. The AI decodes your video into individual frames, analyzes each frame with a neural network that recognizes semantic objects (a face as a face, a wall as a wall), redraws those objects at higher pixel density using patterns from millions of training samples, and re-encodes everything back into a continuous video file.
What upscaling cannot do: add detail that never existed in the source. If you feed a blurry 360p clip into any upscaler, you get a larger blurry clip with AI-hallucinated textures that may look plausible but are fabricated. The single most important rule in upscaling is to start with the best source quality you can generate. If you are new to AI video generation, start with the complete beginner guide to understand how resolution and quality settings work in each generator.
Upscaling vs. Enhancing: They Are Not the Same Thing
When you hear “ai video enhancer,” that term covers a broader set of corrections beyond resolution. Enhancement includes temporal consistency (stabilizing textures across frames so AI-generated content stops flickering), frame interpolation (converting choppy 24fps footage to smooth 60fps or even 480fps slow-motion), denoising and deblurring (removing grain and motion blur while preserving texture), and colorization and HDR upconversion (expanding dynamic range for modern OLED displays). Understanding this distinction matters because the tool you need depends on which problem you are solving.
| Mechanism | Traditional Method | Modern AI Method | Primary Benefit |
|---|---|---|---|
| Upscaling | Bicubic / Nearest-Neighbor (pixel duplication) | Generative Super-Resolution / Diffusion | Native-looking 4K/8K without blur |
| Frame Rate | Optical Flow (causes ghosting) | AI Frame Interpolation (hallucinates new frames) | Ultra-smooth cinematic slow-motion |
| Noise Reduction | Spatial blurring (destroys texture) | Detail-aware neural denoising | Removes grain, keeps skin and fabric textures |
| Stabilization | Cropping and warping borders | AI-driven Steadicam emulation | Fixes jitter without extreme cropping |
| Color/HDR | Manual color grading | AI-powered SDR-to-HDR upconversion | Broadcast-quality dynamic range automatically |
The Complete AI Video Quality Pipeline
Pricing last verified April 30, 2026. API rates are sourced from fal.ai; consumer subscription plans are from each product’s official site. Screenshots and UI references elsewhere in this article may reflect earlier versions. Prices change frequently - double-check with fal.ai or the vendor’s site before making spending decisions.
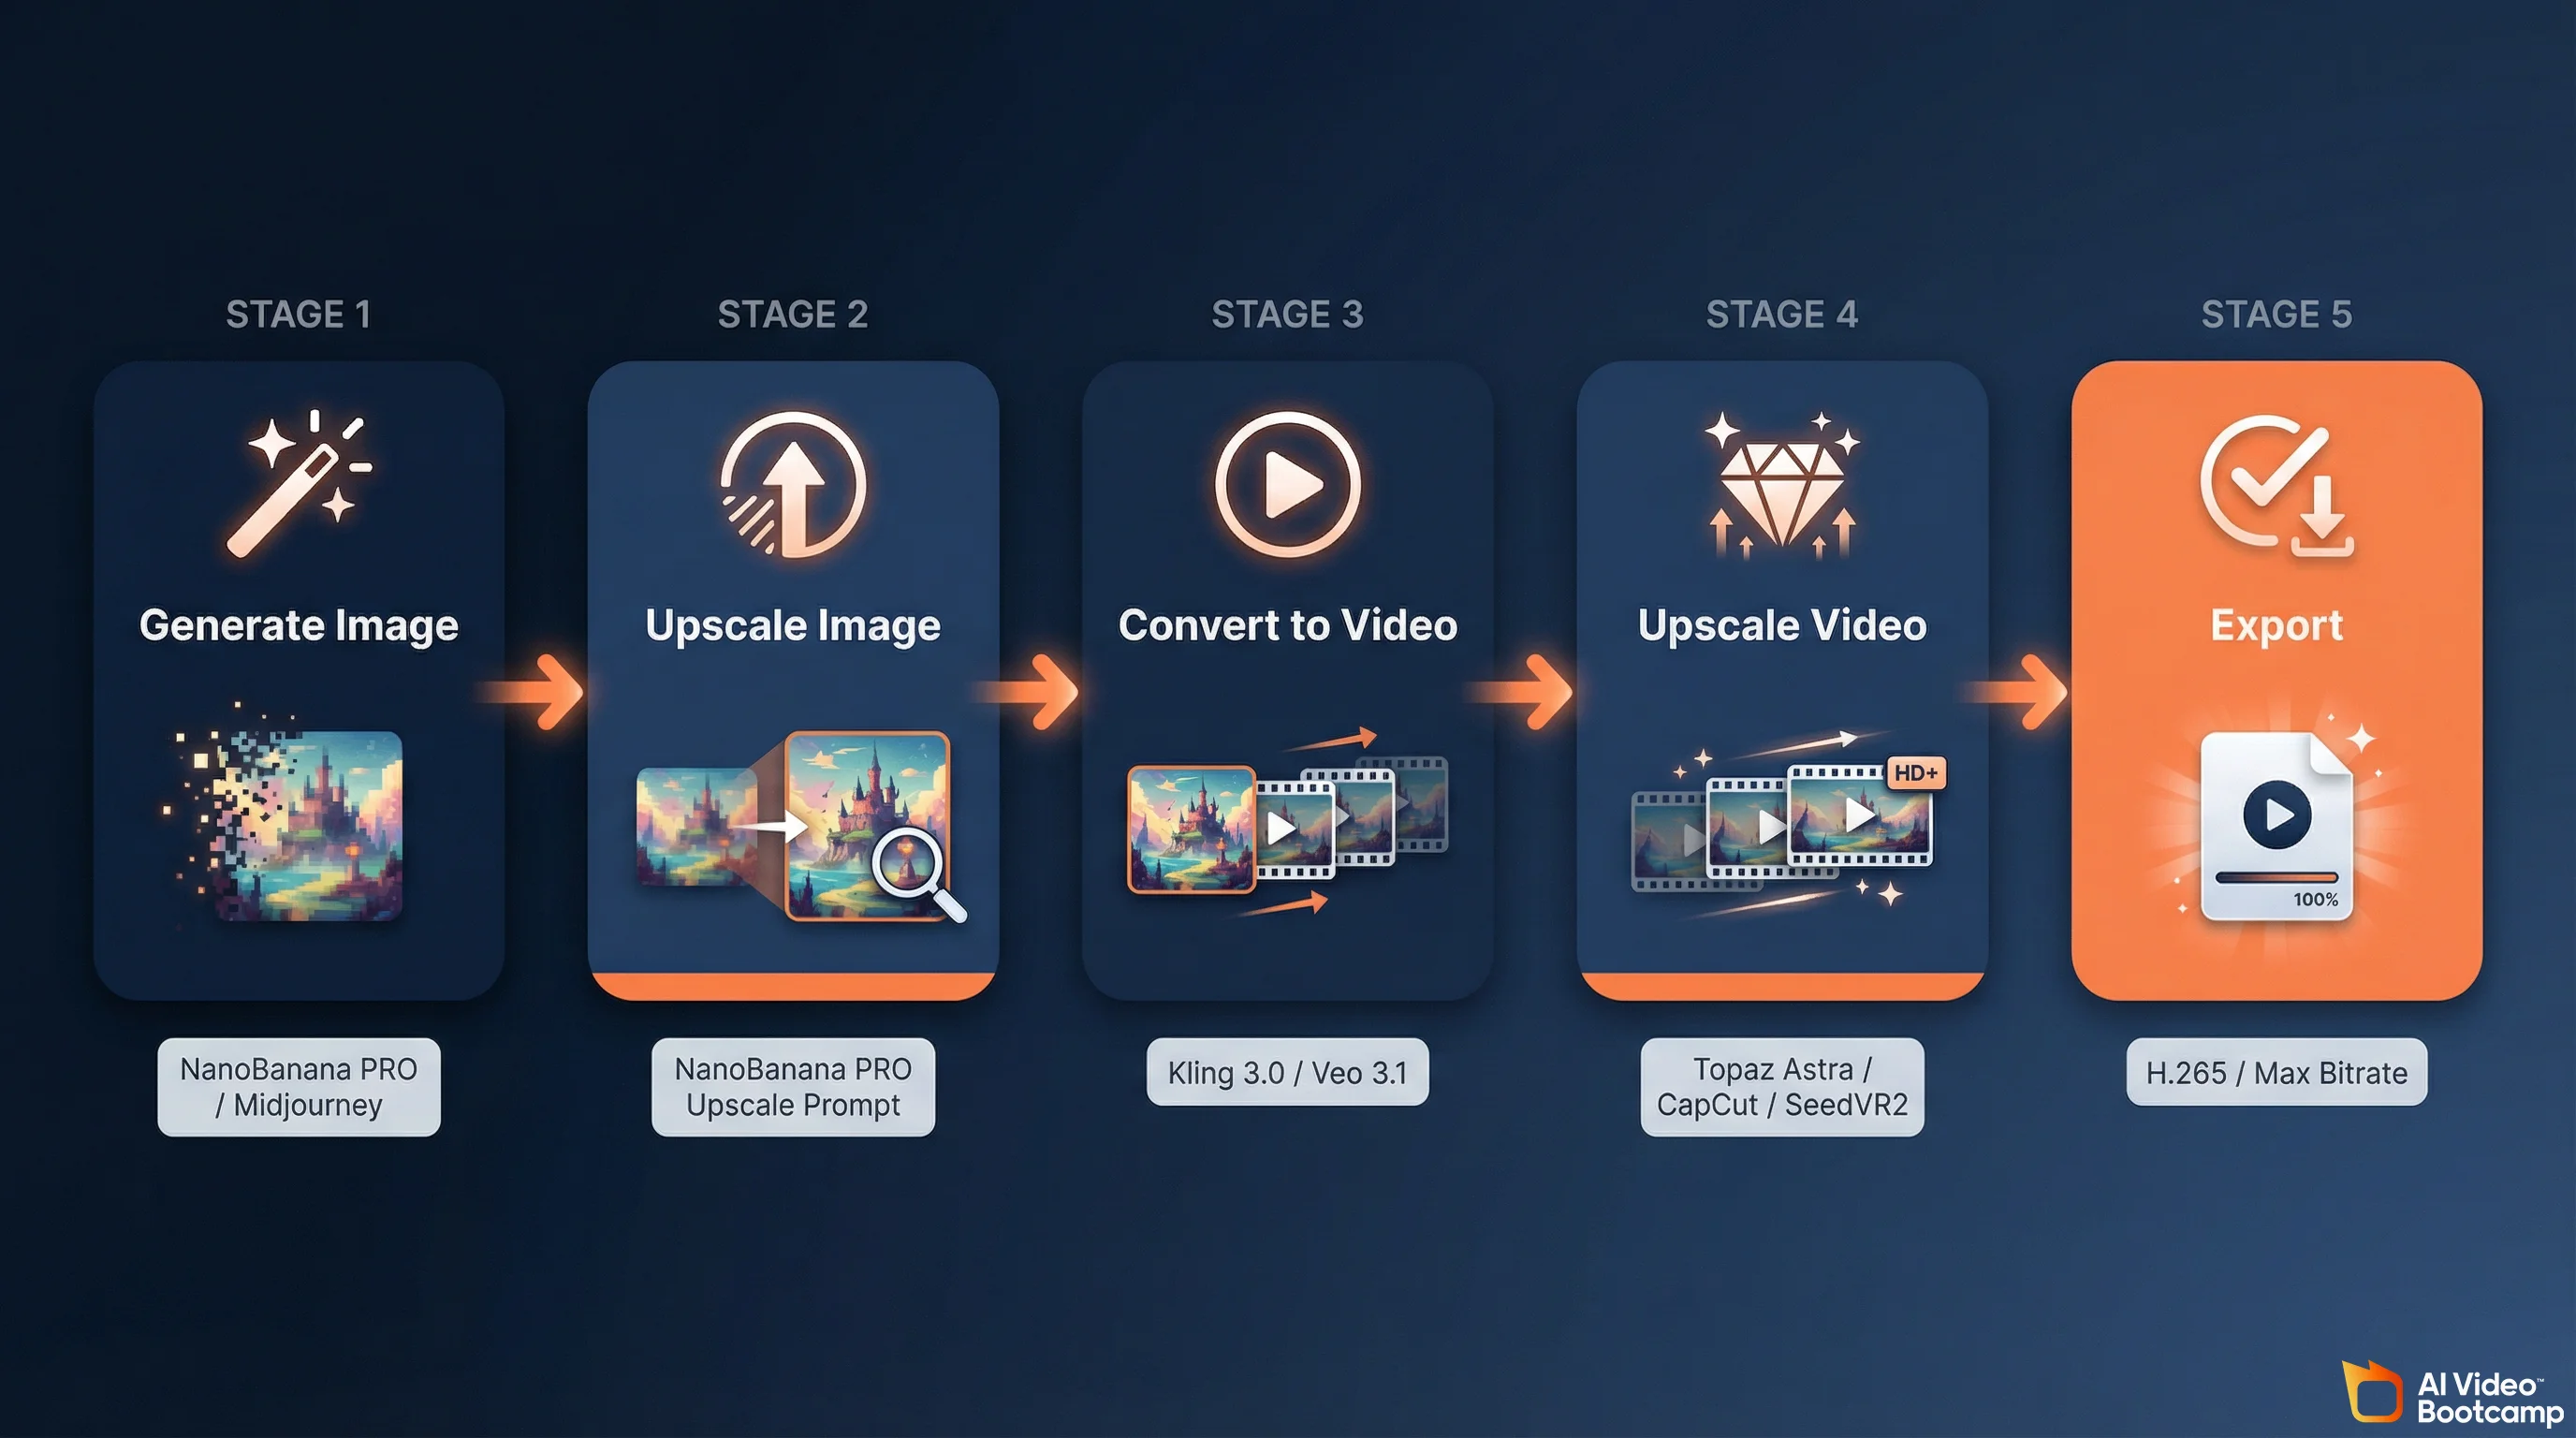
No existing guide covers this full workflow because most articles treat upscaling as an isolated step. For AI creators using tools like Kling 3.0, Veo 3.1, or Seedance, quality is a pipeline problem that starts before you even generate your video. Here is the complete AI Video Quality Pipeline that produces broadcast-grade output from AI generators.
Step 1: Generate at maximum native resolution. Use Kling 3.0 Professional mode or Veo 3.1 quality mode. Include “sharp focus,” “4K resolution,” and “high detail” in your generation prompts. Generate 8-12 variations and select the sharpest one. This single step matters more than any upscaler you choose later.
Step 2: Upscale your source image before video conversion. If you are using image-to-video workflows, upscale the source image to 4K first using NanoBanana PRO (requires Gemini Advanced, ~$20/month). A 4K source image gives the video model dramatically more detail to work with, resulting in cleaner motion and fewer artifacts. This step alone eliminates 60-70% of quality problems.
Step 3: Convert your image or text to video. Feed the upscaled 4K image into Kling 3.0 or Veo 3.1 for image-to-video conversion. The higher the source resolution, the better the video output.
Step 4: Upscale the video output. Run the generated video through Topaz Video AI (Astra model for AI content), UniFab, CapCut (free), or SeedVR2 (free, open-source). This is where you choose based on budget and quality needs.
Step 5: Post-process and export. Color grade in CapCut or DaVinci Resolve. Add voiceover via ElevenLabs. Export with H.265 codec at the highest bitrate your target platform allows. Never re-encode more than once.
The key insight: upscaling at both the image stage and the video stage compounds quality gains. Skipping the image upscale (Step 2) and jumping straight to video upscaling (Step 4) is the single most common mistake AI creators make.
Best Paid AI Video Upscalers Compared
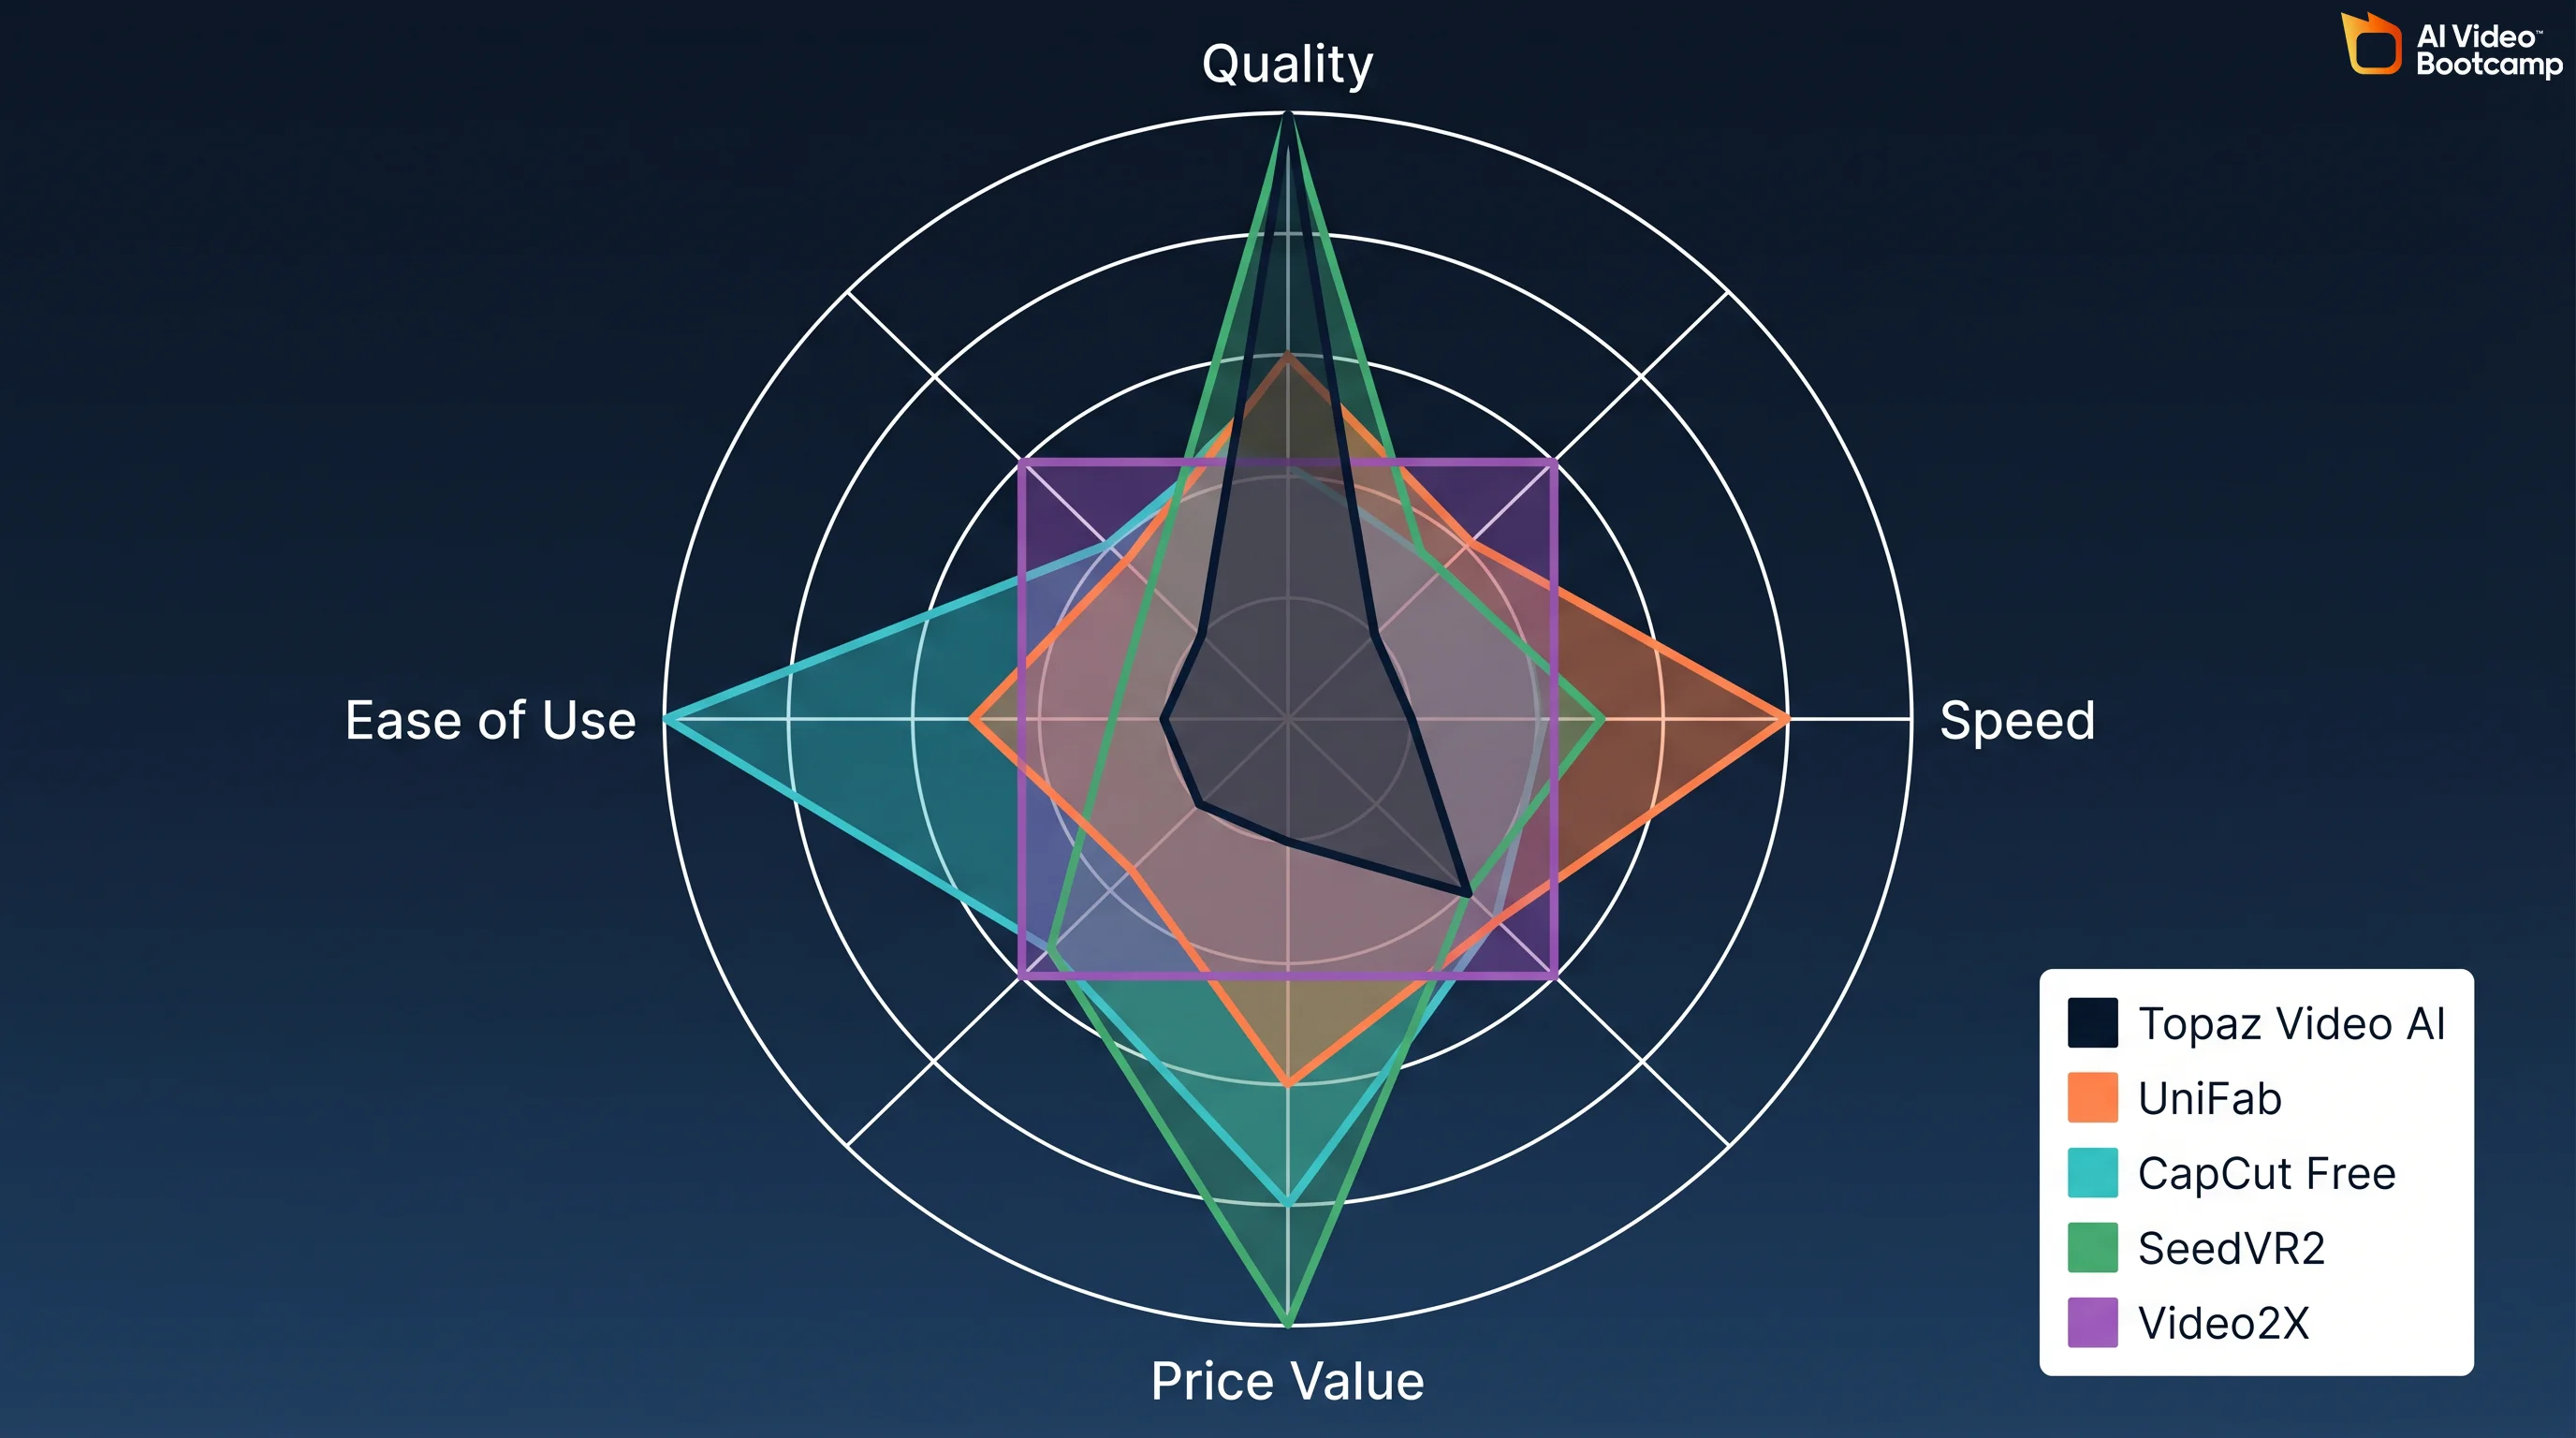
The paid upscaler market in 2026 is dominated by two serious contenders: Topaz Video AI and UniFab All-In-One. Everything else is either too expensive for what it delivers or too limited to recommend. Here is how they stack up against each other and the smaller paid options worth considering.
| Feature | Topaz Video AI | UniFab All-In-One | AVCLabs | VideoProc | Aiarty |
|---|---|---|---|---|---|
| Price | $299/year (Personal) / $699/year (Pro) | $319.99 one-time lifetime | $39.95/month | $45.95/year | $49.99/year |
| Max Output | 16K | 4K | 4K | 8K | 4K |
| AI Models | 19 specialized models | 4 models (Equinox, Vellum, Kairo, Titanus) | Face Recovery AI | Super Resolution | MoDetail technology |
| Processing Speed | 5-8 fps | 8-14 fps | 3-5 fps | 10-15 fps | 8-12 fps |
| Best For | Maximum quality, AI video artifacts, old footage | Speed, batch processing, value | Face recovery in portraits | Frame interpolation to 480fps | Cleaning before upscaling |
| GPU Required | DirectX 12, 8-16GB VRAM | DirectX 12, 6GB+ VRAM | Yes, GPU-intensive | Yes, recommended | Yes, recommended |
| Free Trial | Watermarked output | 30-day full feature, no watermark | Limited | Limited | Limited |
The pricing math tells a clear story. Topaz costs $299 every year. UniFab costs $319.99 once and includes lifetime updates plus licenses for five computers. If you plan to upscale videos for more than 13 months, UniFab is cheaper. If you need the absolute highest quality and have the GPU to run it, Topaz remains the benchmark.
Topaz Video AI Deep Dive: Is $299/Year Worth It?
Topaz Video AI integrates 19 distinct AI enhancement models, each fine-tuned for specific degradation scenarios. The 2026 “Precision Update” represents the most comprehensive model library in any video upscaler. For AI creators specifically, Topaz is worth it if you process 5+ videos per month and have an NVIDIA GPU with 8GB+ VRAM. At $299/year, that is roughly $25/month, less than most SaaS tools in your stack.
The hardware requirements are real: DirectX 12 compatible GPU, 16GB system RAM minimum, 8-16GB VRAM recommended. On lower-end machines, a single 60-second clip can take hours. Independent reviews from VideoProc confirm processing times of 15-40 minutes per 60-second clip depending on GPU. The interface has a learning curve with manual parameters for anti-aliasing, de-haloing, and detail recovery. This is a professional tool, not a one-click solution.
Where Topaz earns its price is model selection. Most users pick the wrong model and get mediocre results. Here is the model guide that actually matters for AI creators:
Topaz Model Selection Guide for AI Creators
Note: Topaz Video AI pricing is $299/year. NanoBanana PRO source image upscaling requires Gemini Advanced ($20/month via Google One AI Premium). All other upscaler pricing should be verified at vendor sites.
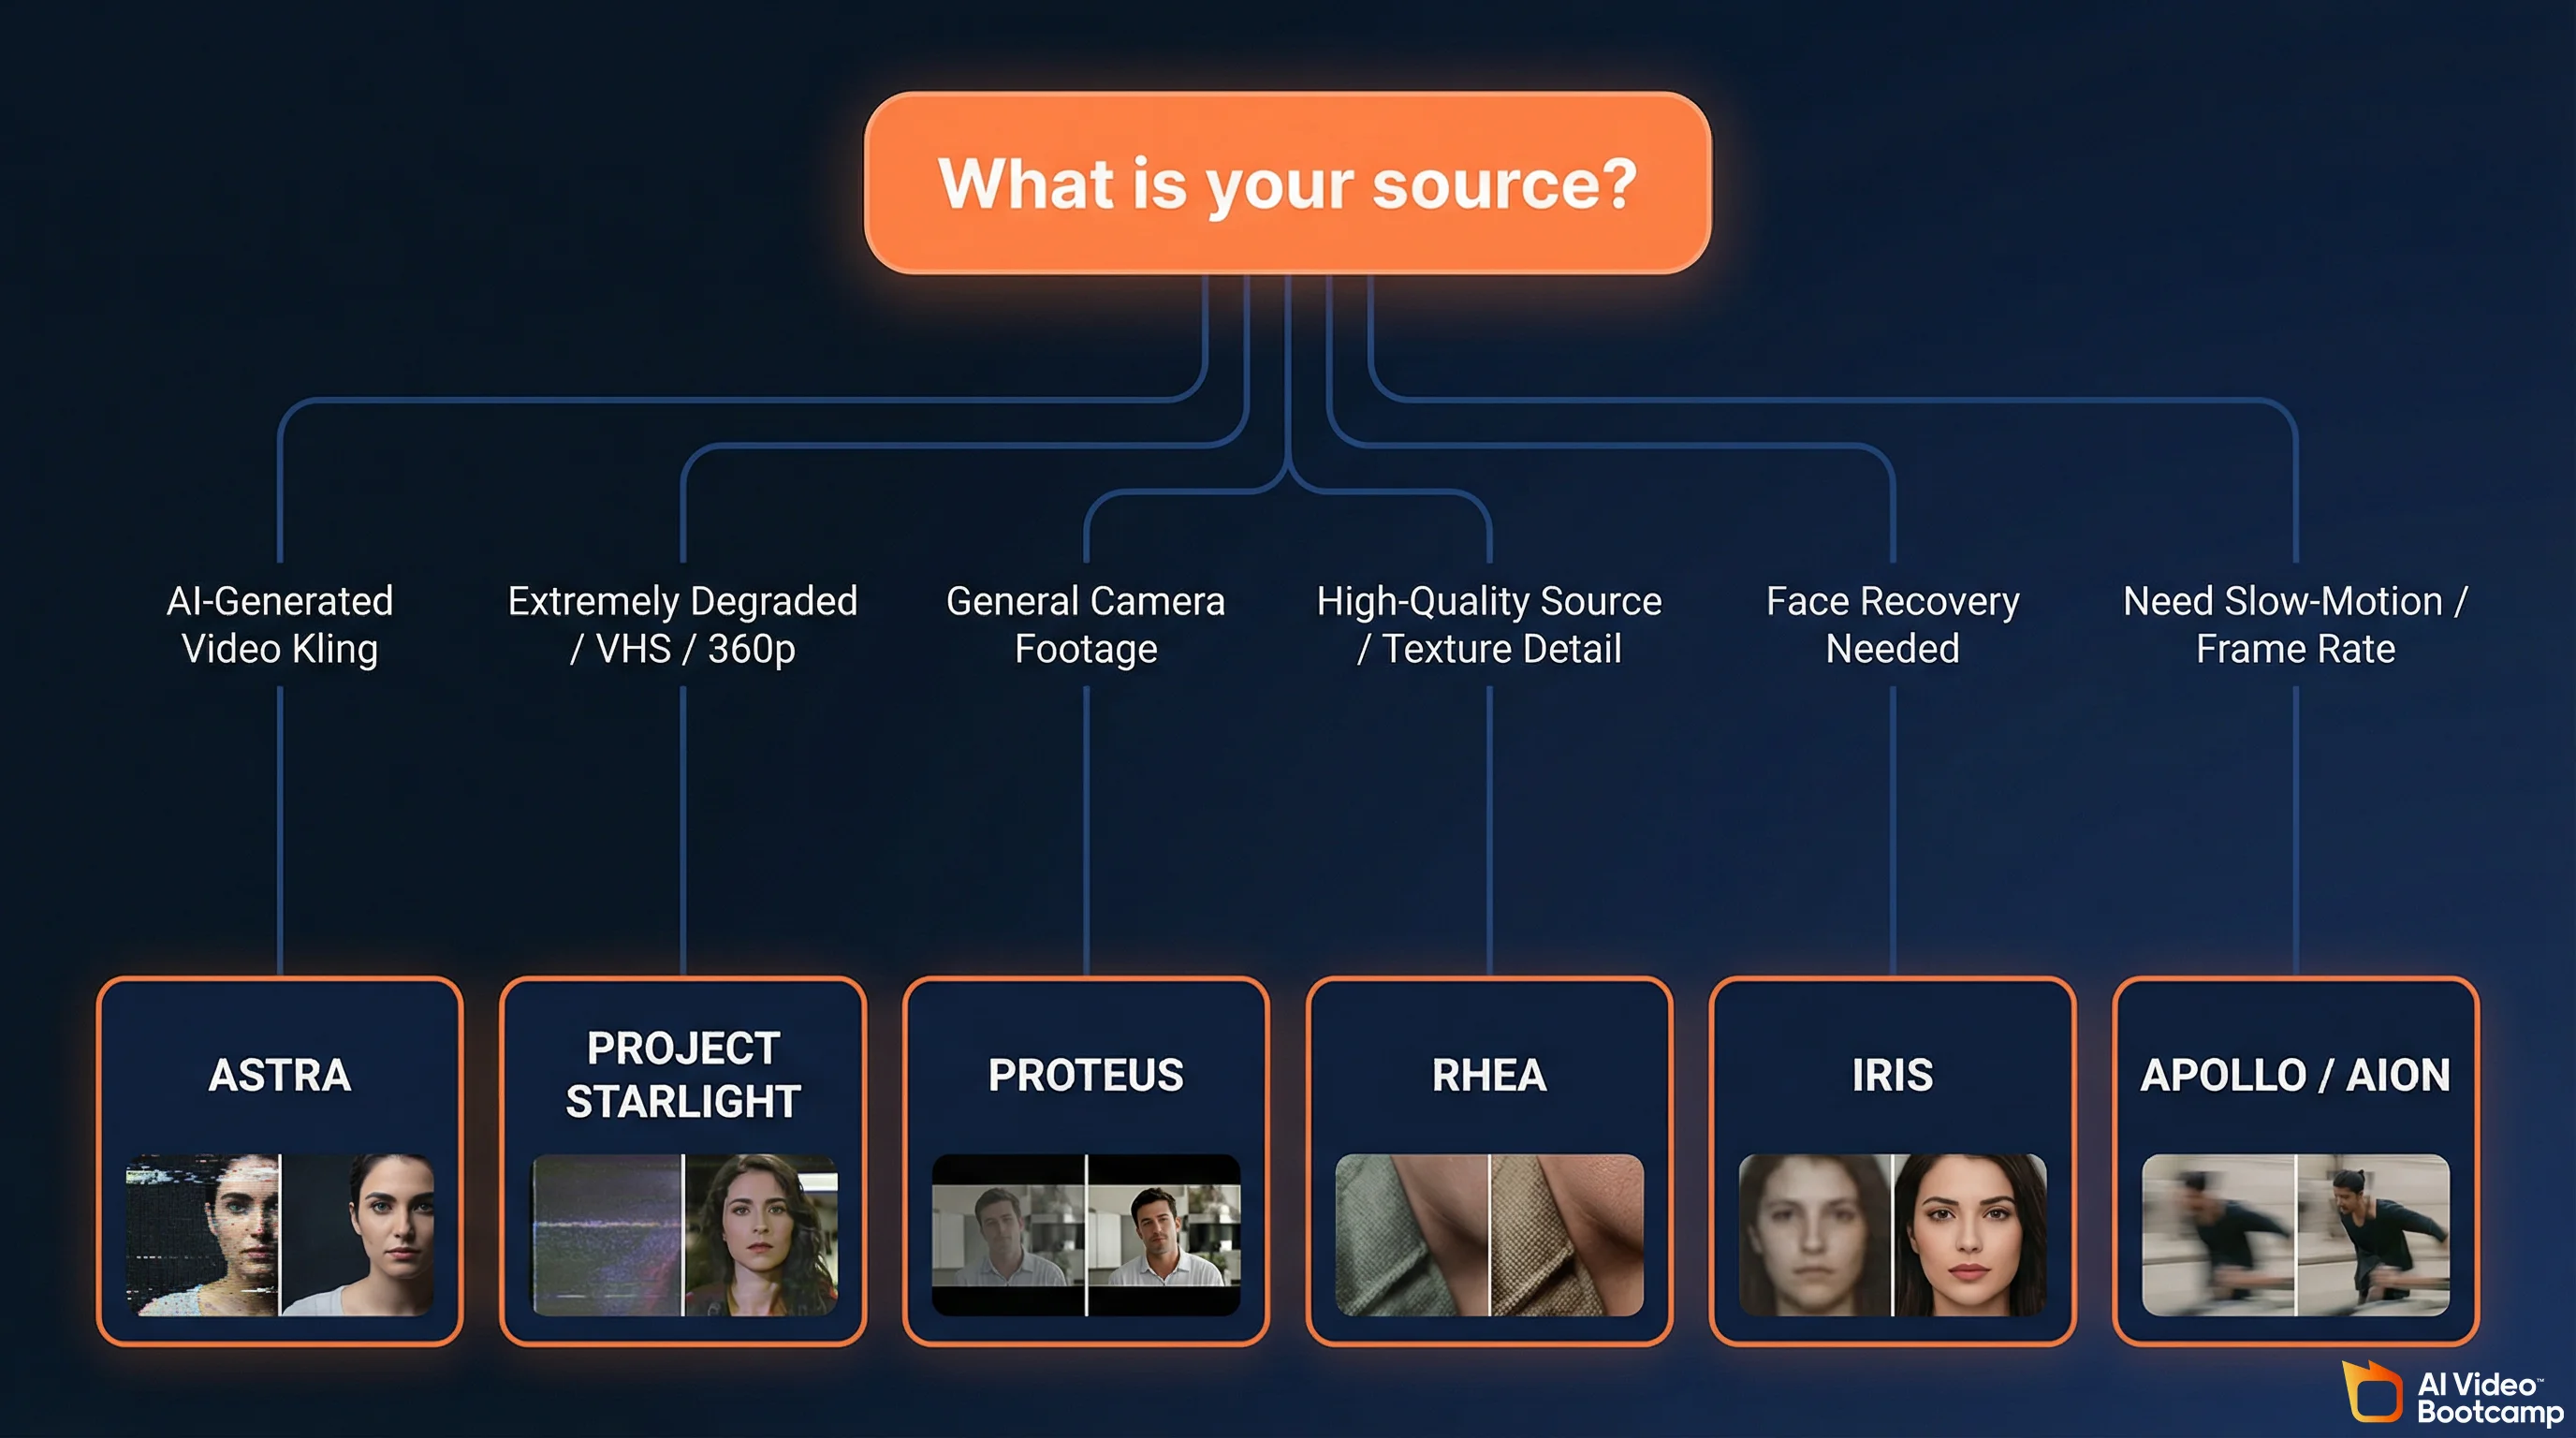
Astra is the model built specifically for AI-generated content. It targets the unique artifacts in synthetic video: edge morphing, structural shifting, and the localized blurring that plagues Kling, Veo, and Seedance outputs. If you are upscaling AI-generated video, start here.
Project Starlight is the newest addition (early 2026), a true diffusion-based model that “reimagines” missing details for extremely degraded sources like VHS rips, 360p social media clips, and heavily compressed footage. It maintains full temporal consistency across frames. Variations include Starlight Sharp for maximum crispness and an AMD/Mac-optimized version.
Proteus is the general-purpose workhorse with granular manual sliders. Use it for mixed content (some AI, some camera footage) or when you want fine control over noise reduction, sharpening, and detail recovery.
Rhea (and Rhea XL) is the “Texture King,” engineered for 4x upscaling of high-quality sources. It excels at organic micro-details: hair strands, fabric fibers, skin pores. Rhea XL is optimized for beauty, fashion, and macro product videography.
Iris is the dedicated face recovery engine for restoring facial symmetry, eyes, and dental details in compressed or noisy footage.
Nyx (and Nyx XL) handles denoising for high-resolution input, stripping sensor noise from low-light footage while preserving natural depth of field.
Apollo, Chronos, and Aion are the frame interpolation models. Apollo handles complex motion, Chronos is for linear motion, and Aion is the premium engine for ultra-smooth slow-motion generation.
The decision tree: AI-generated video? Use Astra. Old or heavily degraded footage? Use Project Starlight. General camera footage? Use Proteus. Need texture detail on high-quality source? Use Rhea. Need face recovery? Use Iris. Need frame rate conversion? Use Apollo (complex motion) or Aion (slow-motion).
UniFab All-In-One: The Topaz Alternative That Costs Less Over Time
UniFab has captured significant market share by offering professional-grade upscaling at $319.99 lifetime versus Topaz’s $299/year recurring cost. For creators who need reliable upscaling without the ongoing expense, UniFab is the value play.
UniFab’s four AI models map directly to Topaz’s ecosystem. Equinox functions like Topaz’s Proteus as a general-purpose upscaler. Vellum targets organic textures like Topaz’s Rhea. Kairo handles 2D animation and cartoon footage like Topaz’s Gaia. Titanus is the heavy-duty restoration model competing with Project Starlight for degraded sources.
The speed advantage is significant: UniFab processes at 8-14 fps compared to Topaz’s 5-8 fps on comparable hardware. For batch processing or tight deadlines, UniFab processes videos nearly twice as fast.
Beyond upscaling, UniFab integrates 18 modules including SDR-to-HDR upconversion, automated video colorization, background removal, vocal isolation, audio upmixing, and AI subtitle generation. These are practical workflow tools that Topaz does not offer.
| Dimension | Topaz Video AI | UniFab All-In-One |
|---|---|---|
| Pricing | $299/year recurring | $319.99 one-time lifetime |
| Processing Speed | 5-8 fps | 8-14 fps (nearly 2x faster) |
| Design Focus | Extreme restoration, granular manual control | Workflow efficiency, batch processing, speed |
| Feature Coverage | Upscale, Denoise, Stabilize, Interpolate | Upscale, HDR, Colorize, Subtitles, Audio Processing |
| User Experience | Advanced (requires deep technical knowledge) | Simple (“one-click” guided workflows) |
| Free Trial | Watermarked output | 30-day full feature, no watermark |
The honest take: Topaz produces slightly better results on extreme restoration jobs and gives you more granular control. UniFab is faster, cheaper over time, easier to use, and includes more workflow tools. For most AI creators producing content for social media and YouTube, UniFab delivers 90-95% of Topaz’s quality at a better price. For archivists and professionals who need pixel-level control on 16K output, Topaz remains the benchmark.
Best Free AI Video Upscalers
Free upscaling breaks into two categories: consumer tools with one-click workflows and open-source tools that require technical setup. Both can produce excellent results, but the tradeoff is always processing speed (5-10x slower than paid options) and manual effort.
CapCut Desktop (Best Free Option for Beginners)
CapCut is the fastest path from AI-generated video to upscaled output. Import your video, navigate to Video > Basic > Enhance Quality, select your target resolution, and export. Zero technical knowledge required, zero cost. The quality is good enough for social media (Instagram, TikTok, YouTube Shorts) where viewers watch on phone screens. For YouTube long-form or professional deliverables, you will see the quality ceiling compared to Topaz or UniFab.
SeedVR2 v2.5 (Best Free Option for Maximum Quality)
SeedVR2 v2.5 from ByteDance is the most significant open-source upscaler released in 2026. According to its GitHub repository, it uses a single-step diffusion transformer that processes 4x faster than multi-step models while requiring only 8GB VRAM. That puts it within reach of most mid-range gaming GPUs. It integrates with ComfyUI, the visual workflow tool popular with AI creators.
SeedVR2 delivers quality that genuinely approaches Topaz on many types of footage. The catch: you need ComfyUI installed, some comfort with node-based workflows, and patience for processing. There is no one-click button. But for AI creators already using ComfyUI for image generation, adding SeedVR2 to the pipeline is a natural extension.
Video2X (Best Free All-in-One Pipeline)
Video2X is an open-source wrapper that routes video frames through multiple upscaling engines (Waifu2X, Anime4K, ESRGAN, SRMD). It runs on Windows, Mac, and Linux. Think of it as a Swiss Army knife: it wraps the best open-source neural networks into one interface so you don’t have to manage each engine separately. Benchmark comparisons show processing is 5-10x slower than Topaz, but the results on live-action footage rival paid options.
Other Free Open-Source Options
Real-ESRGAN uses a generative adversarial network for photorealistic texture synthesis. It processes frame-by-frame and is the best open-source choice for live-action and photographic content. Slow, but effective.
Waifu2X remains the gold standard for anime, cartoon, and 2D animation upscaling. It preserves clean edges and flat colors better than any other tool, free or paid.
Anime4K is the fastest open-source upscaler, capable of real-time playback enhancement without massive GPU overhead. Ideal for media consumption rather than production.
| Open-Source Tool | Best For | Technical Difficulty | Processing Speed | Platform |
|---|---|---|---|---|
| SeedVR2 v2.5 | Maximum quality, AI content | Advanced (ComfyUI) | Fast (single-step) | Win / Mac / Linux |
| Video2X | All-purpose, wraps multiple engines | Intermediate (CLI/GUI) | Slow (5-10x vs Topaz) | Win / Mac / Linux |
| Real-ESRGAN | Live-action, photorealism | Intermediate (Python/CLI) | Slow (frame-by-frame) | Win / Mac / Linux |
| Waifu2X | Anime, cartoon, 2D art | Easy (GUI available) | Moderate | Win / Mac / Linux |
| Anime4K | Real-time playback enhancement | Easy | Fast (real-time) | Win / Mac / Linux |
How to Upscale AI Images Before Video Conversion
This is the step most creators skip, and it costs them the most quality. Before you convert any image to video using Kling or Veo, upscale that source image to 4K. A higher-resolution input gives the video model more detail to preserve during the generation process, resulting in cleaner motion, sharper edges, and fewer artifacts.
NanoBanana PRO (requires Gemini Advanced, ~$20/month) is the best tool for this because it operates on a reasoning-based cognitive architecture. Unlike traditional upscalers that stretch pixels, NanoBanana PRO mathematically plans the logic, lighting, spatial constraints, and material properties of a scene before rendering. It natively supports 2K and 4K output resolutions without relying on post-generation upscaling tricks.
The NanoBanana PRO Upscaling Prompt
Upload your AI-generated image to Gemini and use this prompt:
Ultra high-resolution 4K restoration of the original image, preserving
exact composition and subject integrity.
Enhance fine details to maximum clarity: skin texture, fabric fibers,
surface imperfections, micro-details, and environmental elements.
Apply advanced de-noising, remove compression artifacts, eliminate
grain while retaining natural texture. Restore damaged or aged areas
with realistic reconstruction (scratches, fading, blur, motion artifacts).
Improve sharpness with natural edge definition (no over-sharpening
halos). Correct color fading with accurate color grading, restore
true-to-life tones and dynamic range.
Enhance lighting realism: balanced highlights and shadows,
improved contrast without crushing blacks or blowing highlights.
Add subtle cinematic depth: natural depth of field, realistic focus
falloff, no artificial blur.
Preserve original framing, perspective, pose, and proportions
EXACTLY -- no changes to composition.
Output should look like it was captured on a modern high-end cinema
camera (ARRI Alexa / RED), hyper-realistic, clean, crisp, and
film-quality.
NO artifacts, NO AI distortion, NO plastic skin, NO oversmoothing, NO
stylization, NO change in identity.
Why this prompt works: The explicit composition preservation instruction (“EXACTLY — no changes to composition”) prevents NanoBanana from reinterpreting the scene. The cinema camera reference (ARRI Alexa / RED) activates training data patterns associated with high-end film quality. The negative constraints (NO artifacts, NO plastic skin) are critical because they prevent the common failures of AI upscaling.
The NanoBanana PRO 14-Slot Pseudo-Code Workflow
For professional results, power users structure their NanoBanana PRO prompts using a 14-slot system that speaks directly to the model’s reasoning engine. This eliminates the “hallucination drift” where AI forgets details or alters faces.
Slots 1-3 (Character Turnaround): Upload front, side, and three-quarter photographic references to lock facial structure, proportions, and anatomy.
Slots 4-5 (Brand Assets): Input corporate logo files and exact hex-code color palette swatches as immutable constraints.
Slots 6-10 (Lighting/Vibe): Upload mood board images to define the cinematic aesthetic, specifying whether the scene should mimic 35mm film stock or crisp digital sensors.
The Prompt String: The text prompt references these exact slots to command the model with pixel-level precision.
This methodology produces native 4K images that serve as perfect source material for video conversion. The quality difference between a casually prompted image and a 14-slot image is dramatic. Learn the full NanoBanana PRO workflow and prompt engineering techniques to maximize your source quality. For photorealistic subjects, the photorealistic AI prompts guide covers camera and lens specifications that produce sharper outputs.
How to Upscale Kling, Veo, and Seedance Output
Each AI video generator produces different types of artifacts, and the best upscaling approach varies by model. Here are the specific workflows for the three models taught at AI Video Bootcamp.
Kling 3.0 Upscaling Workflow
Kling 3.0 in Professional mode produces the cleanest native output of any current model, with native 4K at 60fps capability. For Kling output specifically: use Topaz Astra model (built for AI-generated content artifacts), set enhancement to medium (Kling’s output is already clean, over-processing will introduce new artifacts), and export with H.265 at highest bitrate.
Veo 3.1 Upscaling Workflow
Veo 3.1 (requires Gemini Advanced, ~$20/month) tends to produce softer output than Kling with occasional temporal consistency issues. For Veo output: use Topaz Astra model with sharpening increased slightly above default, run Nyx denoising pass first if you see grain or noise, and check temporal consistency frame-by-frame on critical shots.
Seedance 2.0 Upscaling Workflow
Seedance output often has strong motion quality but visible compression artifacts. For Seedance output: use Topaz Astra or UniFab Equinox, focus on denoising and artifact removal before upscaling, and consider running Aiarty’s “Clean-then-Scale” approach (clean compression noise first, then upscale) if artifacts are heavy.
The universal rule across all three models: always generate 8-12 variations and pick the sharpest output before upscaling. This selection step takes five minutes and saves you from trying to fix unfixable source quality. Maintaining visual consistency across characters during the upscaling process is another common challenge covered in depth separately.
Cloud vs. Desktop vs. Open Source: Which Path Is Right for You?
Your choice depends on three factors: technical skill level, budget, and how often you upscale. Here is the decision matrix.
Cloud upscaling options like TensorPix (starting at $5.50/month) are growing fast as the market shifts toward browser-based processing.
Choose cloud tools (CapCut, TensorPix, Wink.ai) if you have no GPU, upscale fewer than 5 videos per month, need results in minutes with zero setup, and your content is primarily for social media platforms.
Choose desktop paid tools (Topaz, UniFab) if you have a dedicated GPU with 8GB+ VRAM, upscale 5+ videos per month, need maximum quality for YouTube or professional deliverables, and want consistent results with customizable settings.
Choose open-source tools (SeedVR2, Video2X, Real-ESRGAN) if you have a GPU and technical comfort with CLI or ComfyUI, budget is the primary constraint, you enjoy fine-tuning parameters, and you are already in the ComfyUI ecosystem for image generation.
| Path | Monthly Cost | Quality Ceiling | Speed | Setup Time | Best For |
|---|---|---|---|---|---|
| Cloud (CapCut) | $0 | Good (social media grade) | Fast (seconds) | 0 min | Beginners, social content |
| Cloud (TensorPix) | $5.50-$30 | Good-Great | Fast | 5 min | Quick cloud jobs, no GPU |
| Desktop (Topaz) | ~$25 ($299/year) | Best | Slow (15-40 min/clip) | 30 min | Maximum quality, professionals |
| Desktop (UniFab) | ~$0 ($319.99 one-time) | Great | Fast (8-14 fps) | 20 min | Value, batch processing |
| Open Source (SeedVR2) | $0 | Great | Moderate | 2-4 hours | Technical users, ComfyUI workflow |
| Open Source (Video2X) | $0 | Good-Great | Slow | 1-2 hours | Technical users, multi-engine |
The Settings That Actually Matter
Most upscaling tutorials obsess over resolution numbers while ignoring the settings that determine whether your output actually looks good. Here are the settings that make the real difference.
Codec selection. Always export with H.265 (HEVC). It delivers roughly 50% better compression than H.264 at the same quality level. Every major platform (YouTube, Instagram, TikTok) supports H.265 in 2026. If your timeline requires H.264 for compatibility, increase bitrate by 40-50% to compensate.
Bitrate. Higher is always better for quality, but each platform has limits. YouTube 4K recommends 35-45 Mbps for H.265 and 44-56 Mbps for H.264. For local archival, use 80-100 Mbps. Never let your editing software choose “automatic” bitrate because it will compress more than you want.
Resolution target. Match your target platform. 4K (3840x2160) for YouTube long-form and professional deliverables. 1080p (1920x1080) for Instagram Reels, TikTok, and YouTube Shorts. Upscaling to 4K for a TikTok wastes processing time because the platform downscales it anyway.
Frame rate. Keep the original frame rate unless you specifically need slow-motion. Upscaling 24fps to 60fps via frame interpolation can introduce ghosting artifacts. If you need smooth slow-motion, use Topaz Apollo/Chronos/Aion or VideoProc’s frame interpolation engine.
The “never double-compress” rule. Every time you export a video, it compresses. Export once from your generator, import directly into your upscaler, export once as final. If you export from Kling, import into CapCut for editing, export, then import into Topaz, export again, each compression pass degrades quality. Plan your pipeline to minimize export steps.
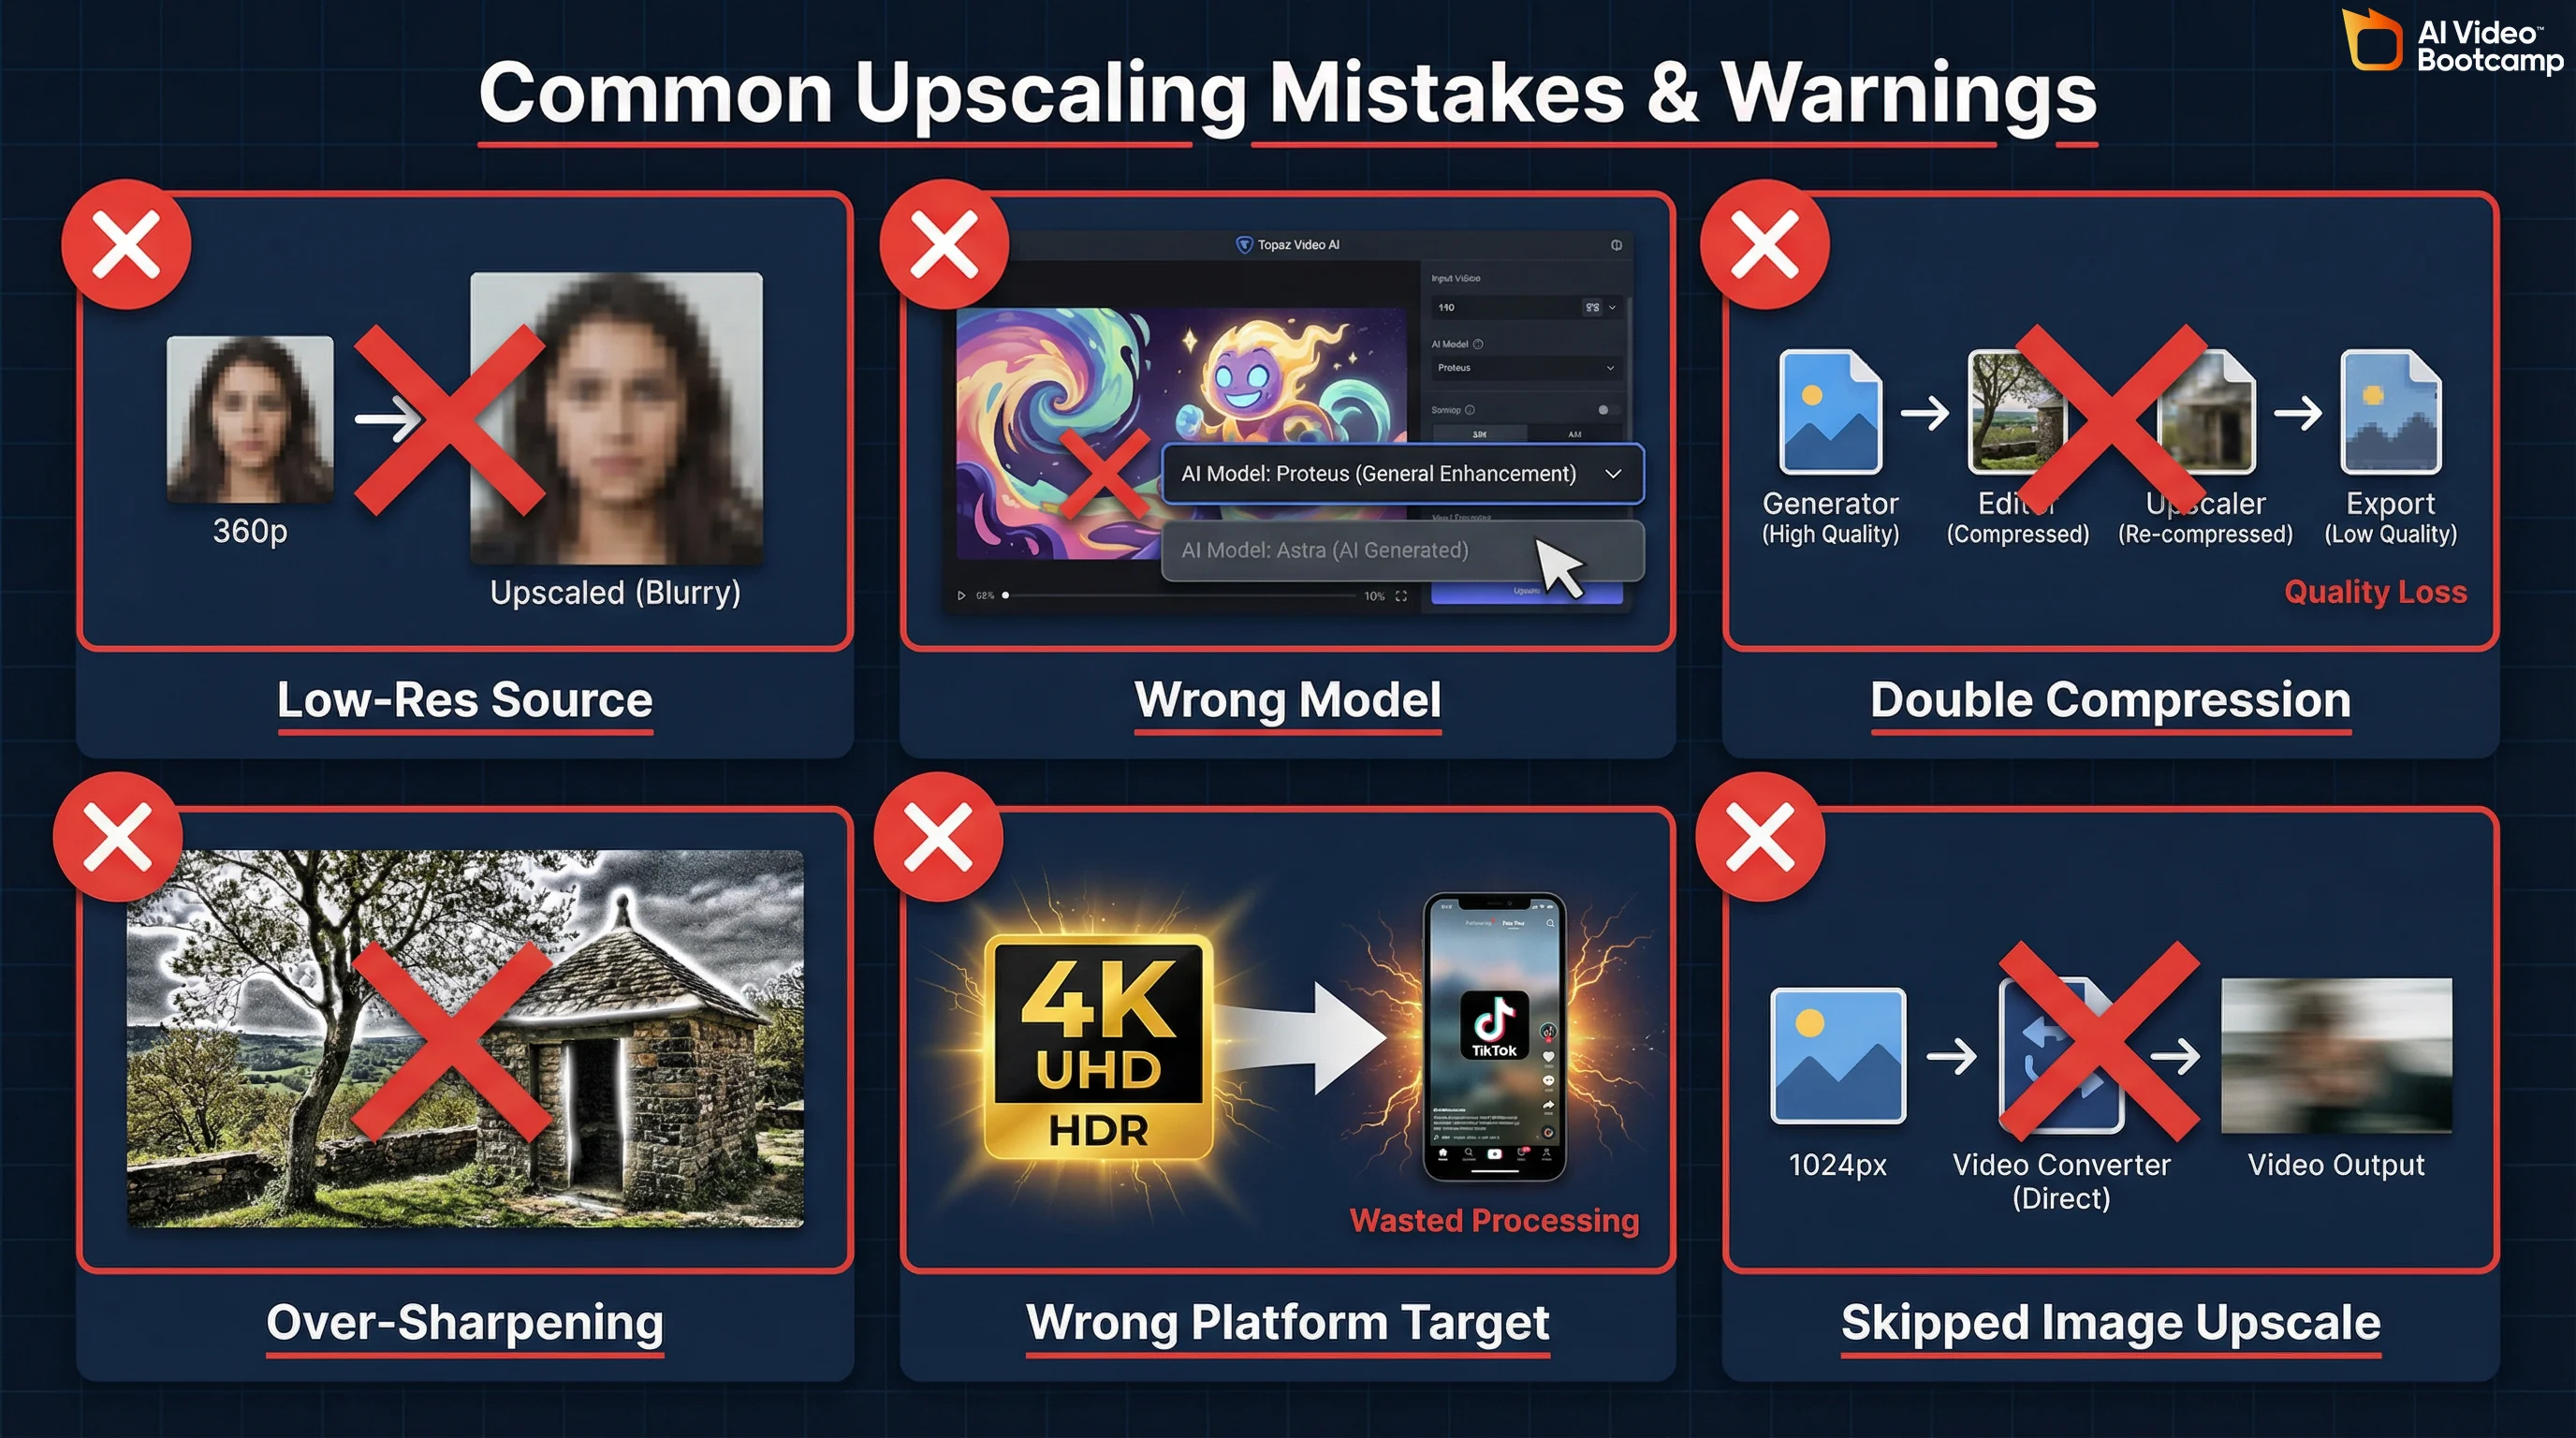
Common Upscaling Mistakes (And How to Fix Them)
After working with hundreds of AI creators, these are the mistakes that waste the most time and produce the worst results.
Mistake 1: Upscaling low-resolution source material. Garbage in, garbage out. No upscaler can add detail that does not exist. If your Kling output is blurry at 720p, upscaling to 4K gives you a sharper-looking blur. Fix: generate at maximum resolution, generate multiple variations, and select the sharpest source before upscaling.
Mistake 2: Choosing the wrong Topaz model. Using Proteus (general-purpose) on AI-generated content when Astra (built for AI artifacts) exists is the most common Topaz mistake. Astra is specifically trained on the edge morphing, structural shifting, and localized blurring patterns unique to synthetic video. Fix: match your model to your source type using the model selection guide above.
Mistake 3: Over-sharpening. Aggressive sharpening creates visible halos around edges and an unnatural “crunchy” look. This is especially common when using Topaz with default settings on content that is already reasonably sharp. Fix: reduce sharpening to 30-50% of default and increase it only if the output looks soft at 100% zoom.
Mistake 4: Double-compression. Exporting from your generator, editing in one tool, exporting, upscaling in another tool, exporting again. Each export compresses. Three export cycles can visibly degrade quality. Fix: plan your pipeline to minimize export steps. Generate, upscale, edit, export once.
Mistake 5: Upscaling for the wrong platform. Spending 40 minutes upscaling to 4K for a TikTok that will be compressed to 1080p by the platform is wasted effort. Fix: match your upscale target to your distribution platform. 4K for YouTube, 1080p for social.
Mistake 6: Skipping the image upscale step. Converting a 1024x1024 image directly to video instead of upscaling to 4K first. The video model has less detail to work with, producing muddier output. Fix: always upscale source images to 4K using NanoBanana PRO before image-to-video conversion.
The Economics: When Free Tools Hit Their Limit
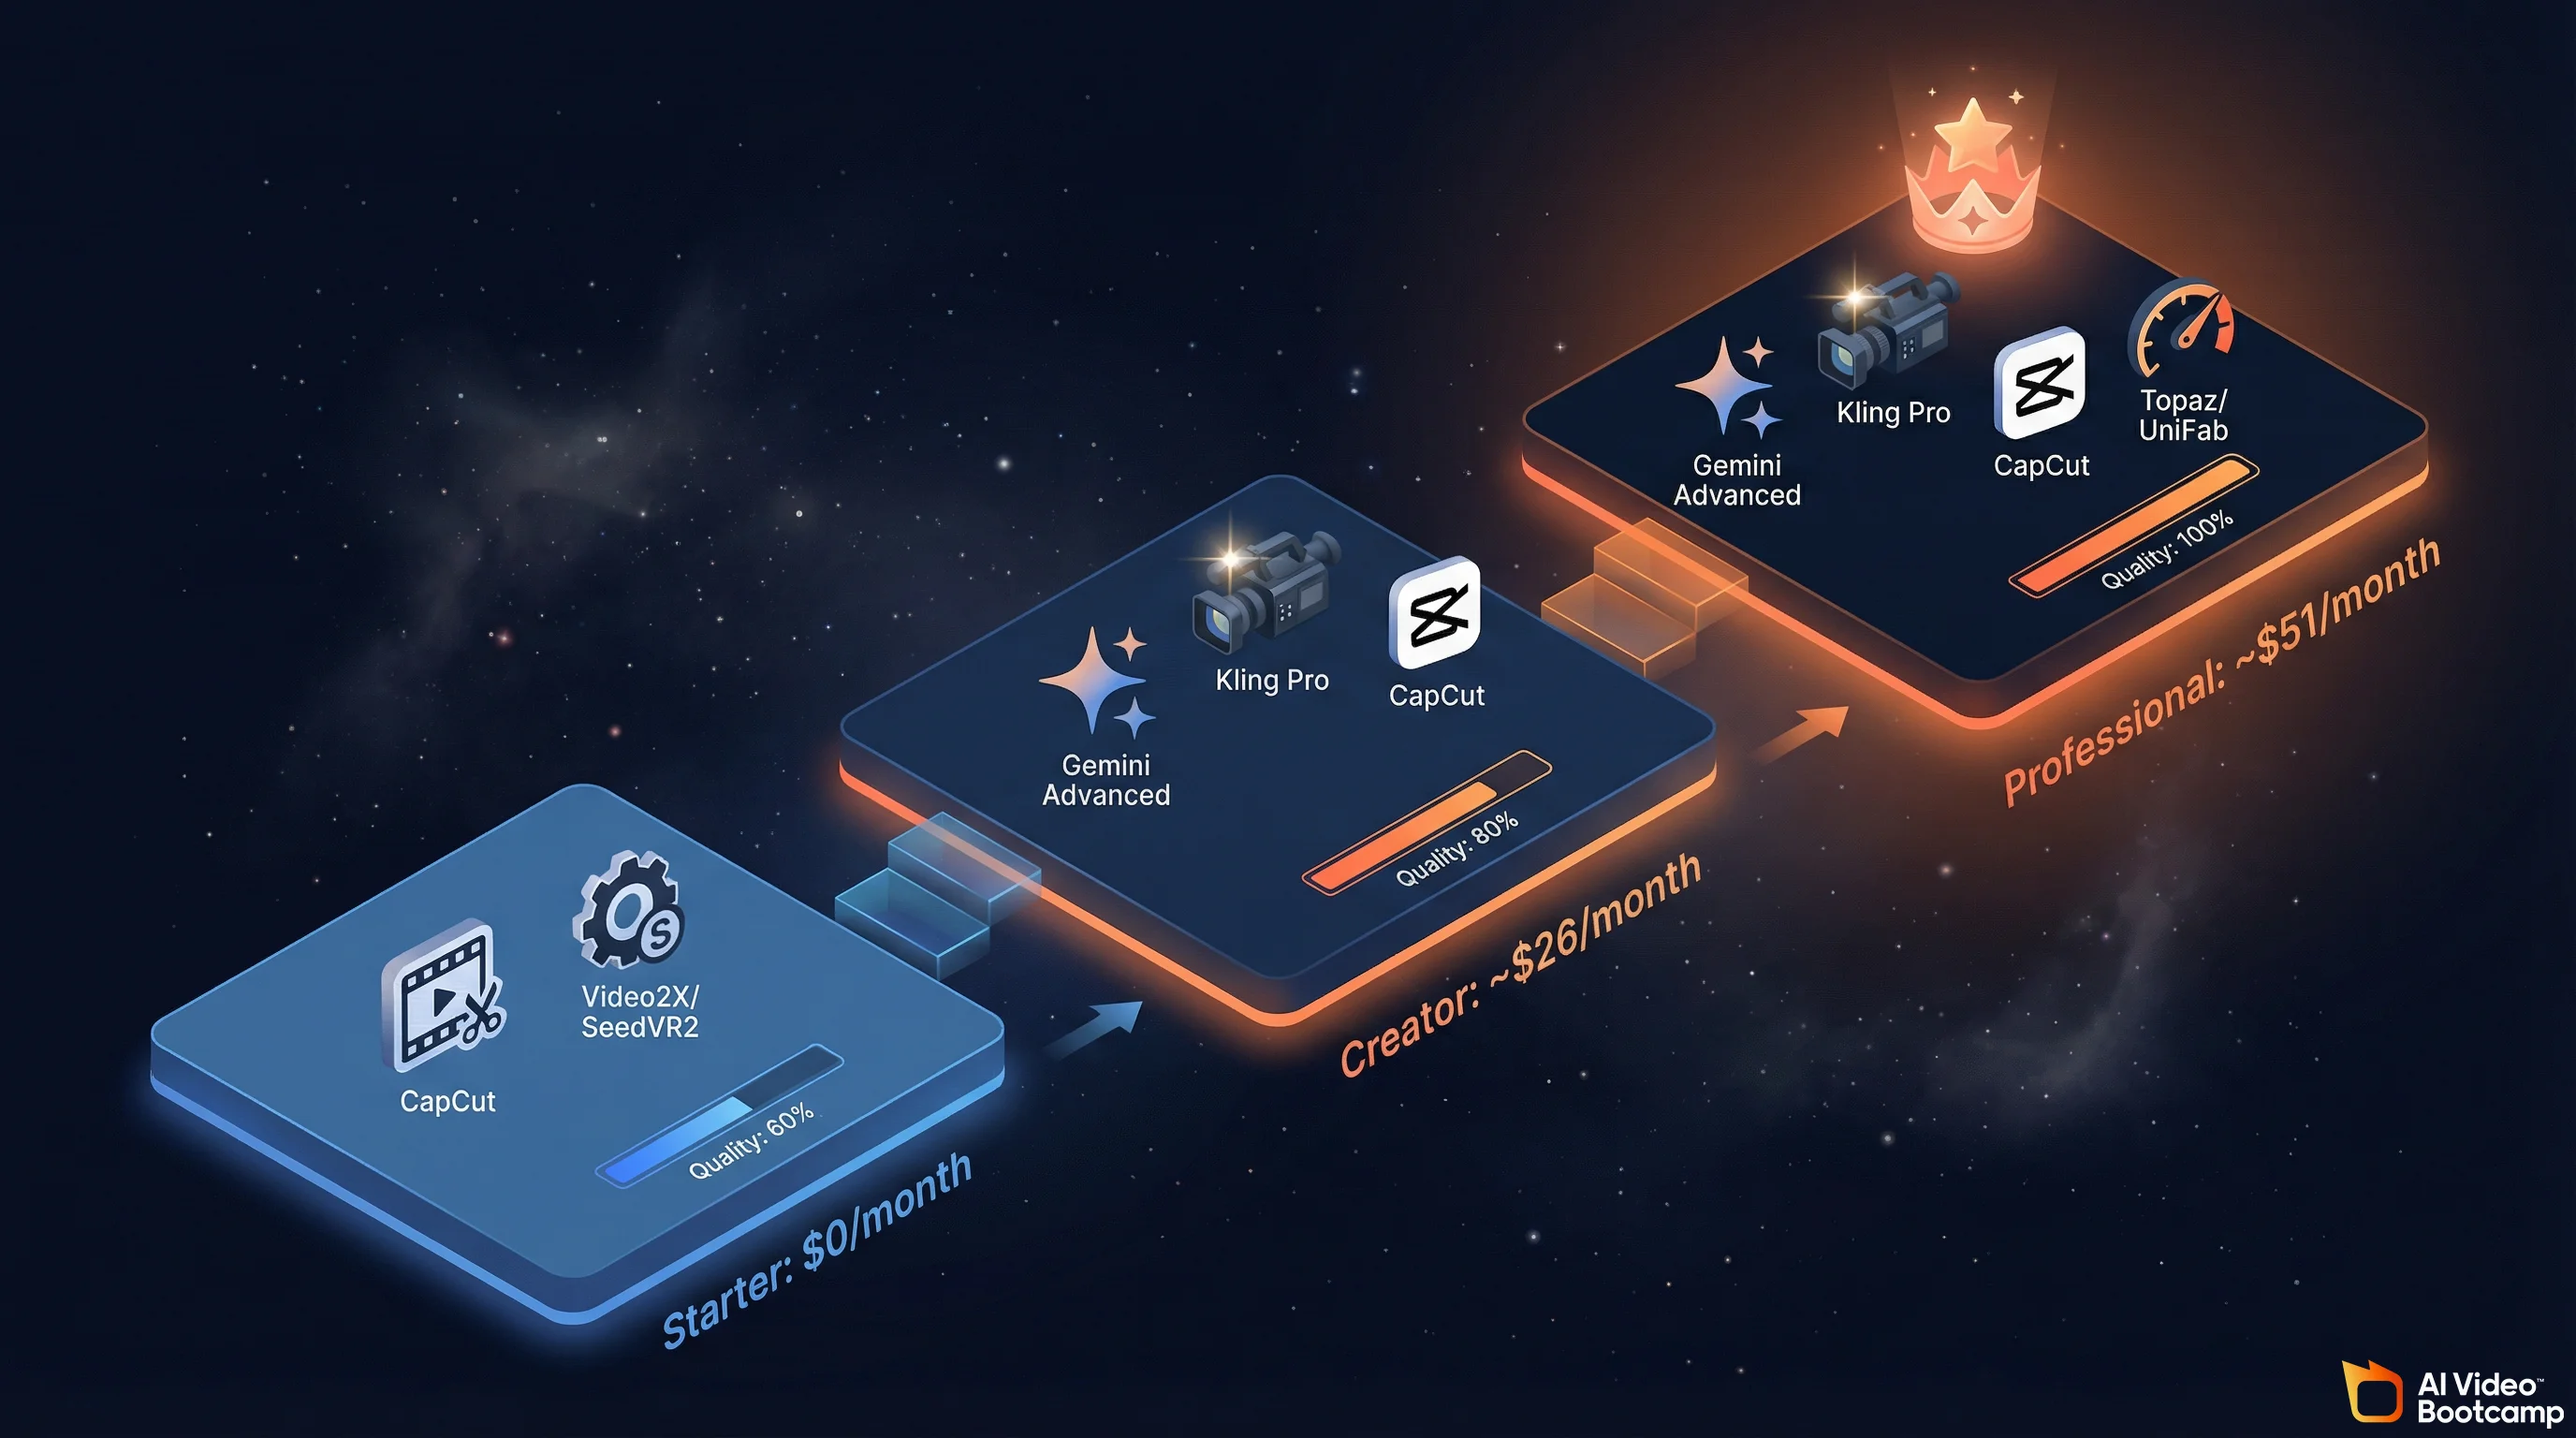
Understanding when to upgrade from free to paid tools is a budget decision, not a quality religion. Here are three tiers mapped to real creator scenarios.
Tier 1: $0/month (CapCut + Open Source)
Tools: CapCut Desktop (free upscaling), Video2X or SeedVR2 (open-source), free AI video generators.
Best for: Hobbyists, students, creators testing the waters. Social media content where phone-screen viewing hides quality differences.
Limitation ceiling: Processing speed (5-10x slower than paid), no specialized AI models for different content types, manual technical setup for open-source tools, quality ceiling visible on large screens and YouTube 4K.
Tier 2: ~$26/month (Gemini Advanced + Kling Pro)
Tools: Gemini Advanced (~$20/month for NanoBanana PRO + Veo 3.1), Kling Pro ($6/month), CapCut Desktop (free editing + upscaling).
Best for: Serious creators, small businesses, freelancers producing regular content. This tier gives you the full quality pipeline: NanoBanana PRO image upscaling, Veo 3.1 and Kling video generation, and CapCut upscaling for the final video.
Limitation ceiling: CapCut’s upscaler is good but lacks the model-specific optimization of Topaz. You won’t match Topaz Astra quality on AI-generated content. Fine for YouTube and social, noticeable gap on large-screen professional deliverables. If you are building a business around AI video, the AI video for business guide covers how to evaluate tool ROI at this tier. The AI video skill stack also maps what technical skills you need at each budget level.
Tier 3: ~$51/month or $319.99 One-Time (Full Professional Stack)
Tools: Gemini Advanced (~$20/month), Kling Pro ($6/month), plus Topaz Video AI ($299/year = ~$25/month) OR UniFab ($319.99 one-time).
Best for: Professional creators, agencies, anyone producing 10+ videos per month or delivering to clients who view on large screens.
Why it is worth it: Topaz Astra is specifically trained for AI-generated content. The quality difference between CapCut free upscaling and Topaz Astra on Kling/Veo output is visible and significant on any screen larger than a phone. UniFab at $319.99 one-time is the better financial choice if you plan to upscale for more than 13 months. For creators producing AI video ads or client deliverables, this tier pays for itself within the first project. The latest generative AI statistics show that 78% of businesses plan to increase video content in 2026, so the investment has a clear runway.
Your First Upscale: A 15-Minute Workflow
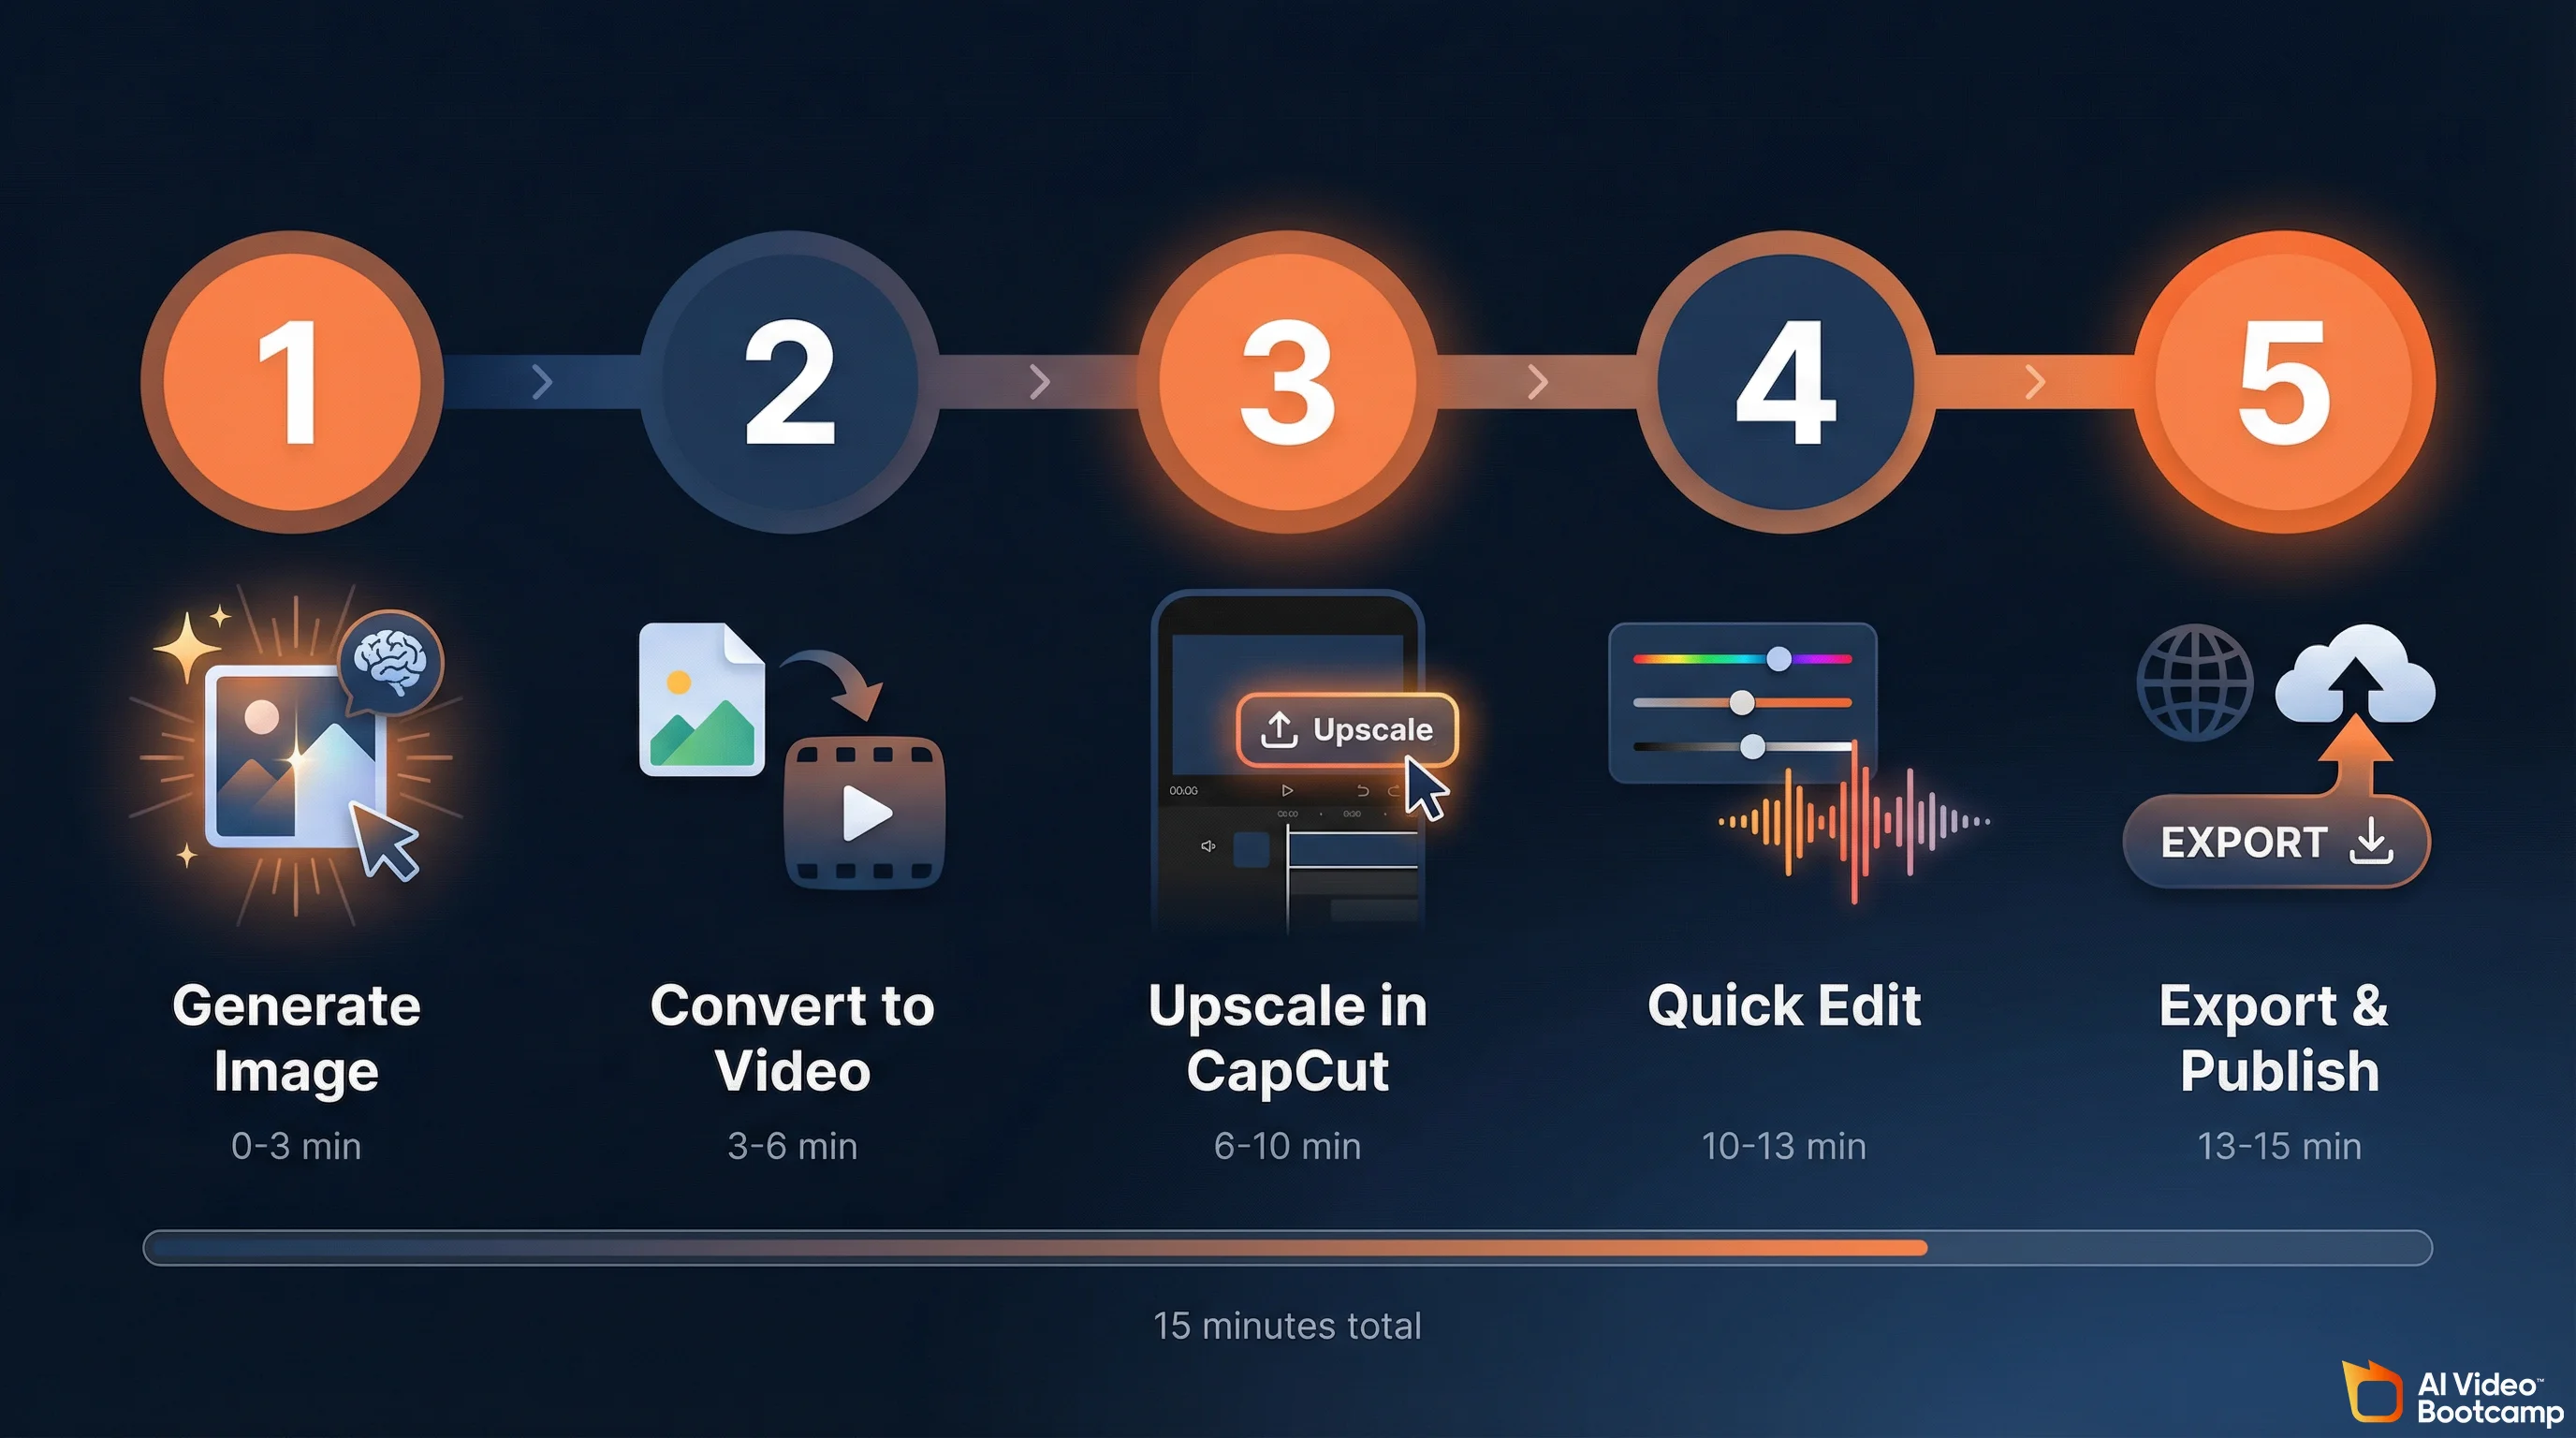
Here is a complete beginner workflow from AI image to finished upscaled video using free tools. Total time: 15 minutes, total cost: $0 (using CapCut and free generation credits).
Minutes 1-3: Generate your source image. Open your AI image generator of choice. Write a detailed prompt including “sharp focus, 4K resolution, high detail.” Generate 8-12 variations. Pick the sharpest one. If you have NanoBanana PRO, upscale the image to 4K before proceeding. If you are using photorealistic prompts, include camera and lens specifications in your prompt for maximum sharpness.
Minutes 3-6: Convert to video. Upload your selected image to Kling (free tier available) or Veo 3.1. Set to highest quality mode. Generate the video clip.
Minutes 6-10: Upscale in CapCut. Open CapCut Desktop. Import the generated video. Go to Video > Basic > Enhance Quality. Select 4K output. Let CapCut process.
Minutes 10-13: Quick edit. Add a simple color grade in CapCut (increase contrast slightly, add subtle warmth). Trim any unwanted frames from the beginning or end. Add a voiceover or sound effect if needed.
Minutes 13-15: Export. Export with H.265 codec, highest quality setting. Upload directly to your platform.
That is it. From AI image to upscaled, edited, published video in 15 minutes. As you get comfortable, you can upgrade individual steps: NanoBanana PRO for image upscaling, Topaz or UniFab for video upscaling, DaVinci Resolve for color grading. Each upgrade improves one step without changing the overall workflow. The AI video generators ranked for 2026 covers which generator produces the highest native quality if you want to minimize upscaling needs from the start. And if you are looking to monetize your AI video skills, mastering upscaling is one of the fastest ways to differentiate your output from the competition.
Frequently Asked Questions
How do you AI upscale video?
The fastest method: open CapCut Desktop, import your video, click Video > Basic > Enhance Quality, select your target resolution (up to 4K), and export. For higher quality, use Topaz Video AI ($299/year) with the Astra model for AI-generated video or Proteus for camera footage. For free maximum quality, install SeedVR2 v2.5 in ComfyUI (requires 8GB VRAM GPU). Always start with the highest quality source file, because upscaling cannot add detail that was never captured.
How do you enhance AI video quality?
Three steps. First, generate at the highest native resolution your tool supports (Kling 3.0 Professional mode, Veo 3.1 quality mode). Second, upscale the output using Topaz Video AI Astra model or CapCut free. Third, post-process with color grading in CapCut or DaVinci Resolve, add audio via ElevenLabs, and export with H.265 codec at the highest bitrate your platform allows. The biggest quality gain comes from better source generation, not better upscaling.
Is Topaz Video AI worth the $299 per year?
Yes, if you regularly upscale 5+ videos per month and need maximum quality. Topaz offers 19 AI models including Astra (built specifically for AI-generated content), supports up to 16K output, and remains the industry benchmark. At $299/year, it costs about $25/month. Not worth it if you only upscale occasionally (use CapCut free), lack a dedicated GPU (processing will be painfully slow), or your content is social-media-only where phone screens hide quality differences. Alternative: UniFab at $319.99 one-time offers comparable quality with faster processing.
What is the best free AI video upscaler in 2026?
For beginners, CapCut Desktop offers one-click AI upscaling to 4K at no cost. For maximum free quality, SeedVR2 v2.5 is the best open-source option: it uses single-step diffusion, runs on 8GB VRAM GPUs, and integrates with ComfyUI. Video2X is another strong free option that wraps multiple upscaling engines (Waifu2X, ESRGAN, Anime4K) into one interface. The tradeoff with