
Getting good at AI image generation is a skill you build on purpose, not a lucky prompt you stumble into. The people who produce reliable, professional-looking work are not the ones with a secret phrase. They are the ones who learned to control the image, spot what is off, and fix it, again and again.
This is a complete roadmap for building that control. It maps the whole journey: the order to learn things in, how to practice so it actually sticks, how long it really takes, and how to push past the wall where every result looks fine but never great. It is written for someone who wants to genuinely get good, not just make one lucky image.
The short version
Mastery here means repeatable control: you can describe what you want, get it across different subjects and styles, and revise it without breaking what already works. You reach it by climbing a clear skill ladder, one rung at a time, using deliberate practice rather than endless tutorials. Start with a simple six-part prompt recipe that grows into a more powerful grammar, practice one element at a time with fast feedback, and space your sessions across the week. Most motivated learners reach basic control in two to four weeks and reliable, paid-quality work in a few months.
What “getting good” actually means
Beginners chase a better prompt. Skilled creators chase repeatable control: the ability to decide what they want and reliably get it, then fix it when it is close. “Good” is not one stunning image you got by luck. It is a set of images that match, on purpose, because you understood why each one came out the way it did.
That distinction matters because real work almost never asks for one nice picture. It asks for a direction held steady: five ad concepts in one style, the same character across a sequence, a poster with text that is spelled correctly and laid out cleanly. The skill is holding the parts you want and changing only the parts you do not.
The skill ladder
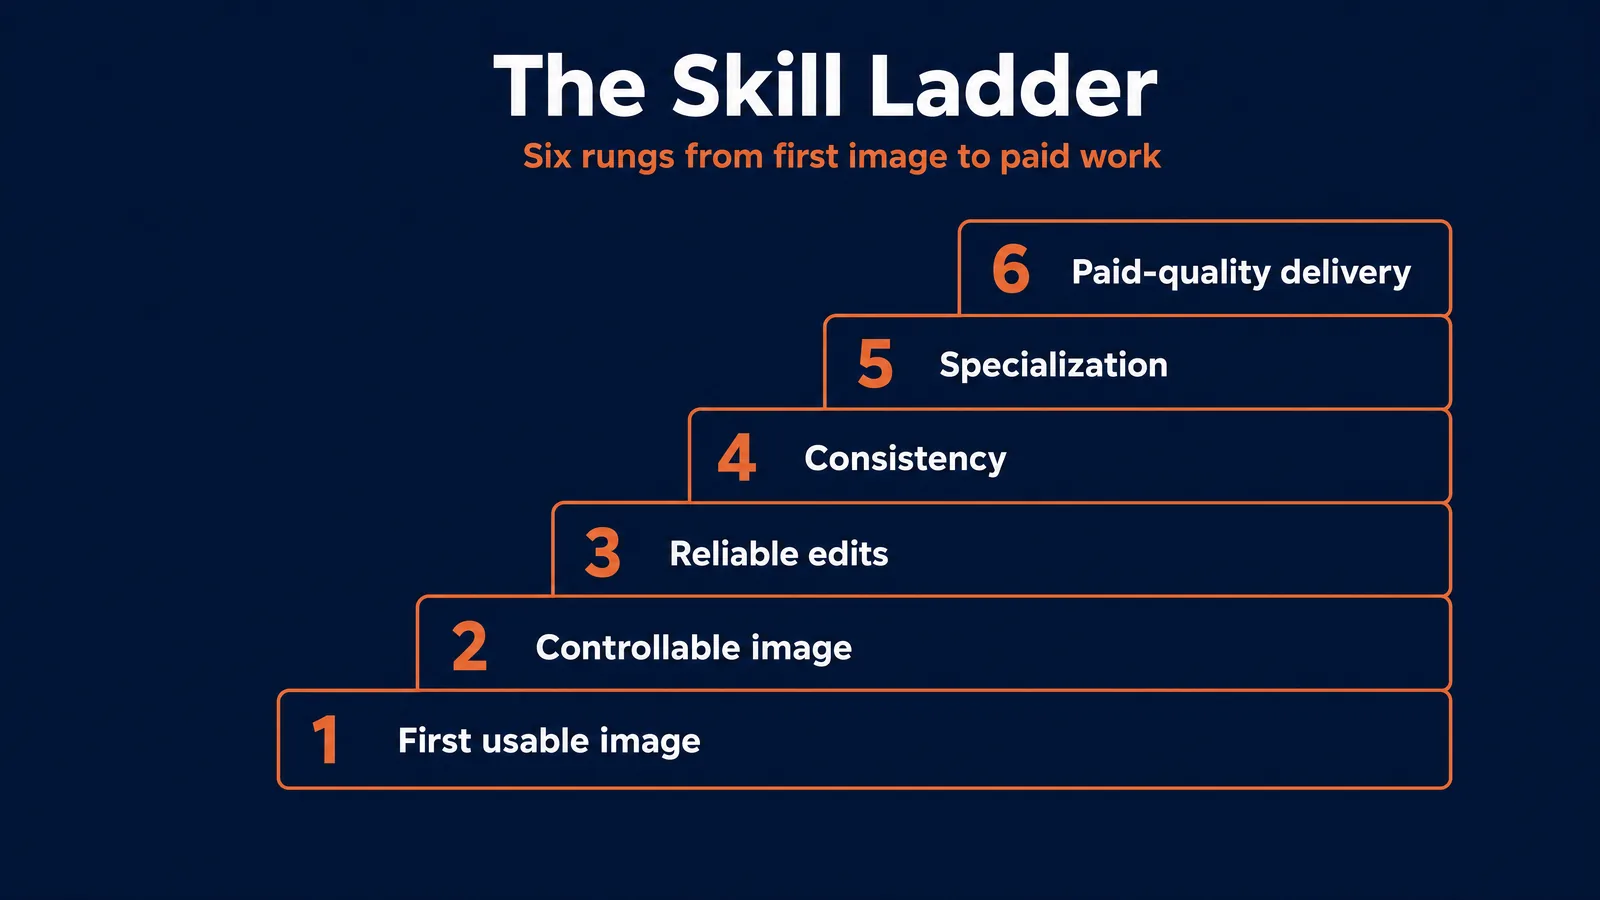
Learning happens in a clear order. Each rung depends on the one before it, and each has a simple self-check so you can tell where you actually are, not where you feel you are.
| Rung | What you can do | Self-check |
|---|---|---|
| 1. First usable image | Turn an idea into a decent single image in one tool | You can get a not-embarrassing image of a clear idea |
| 2. Controllable image | Move one prompt element on purpose, not by luck | You change only the lighting, or only the angle, and predict the result |
| 3. Reliable edits | Fix one part of an image without breaking the rest | You make three different edits to one base image and keep the subject intact |
| 4. Consistency | Hold a character, product, or style across many images | The same face and outfit survive three different scenes |
| 5. Specialization | Produce repeatable work for one real use case | A small set that fits a real brief: product, poster, or real estate |
| 6. Paid-quality delivery | Take a brief, give options, revise to feedback, deliver | A portfolio that shows control, not just nice pictures |
Notice that only the first rung is about making an image at all. Everything above it is about control: changing one thing, protecting the rest, holding a look steady, and delivering to a standard. That is the real curriculum.
How people actually learn a visual skill
The research on how people build skills is consistent, and it maps cleanly onto AI images. The headline: it is not about working harder or logging more hours. It is about practicing in the specific way that produces improvement. Five principles do most of the work.
Deliberate practice. K. Anders Ericsson’s research on expertise showed that elite performers improve through deliberate practice: focused, effortful work aimed at a specific weakness, just beyond your current level, with immediate feedback. The opposite is comfortable repetition, which feels productive and teaches you almost nothing. In practice this means one focus per session. Today is a lighting day. Generate ten controlled attempts, compare them, keep the best two, and write down the one thing you learned.
The worked-example effect. Cognitive-load research (John Sweller and others) found that novices learn complex skills faster by studying fully worked examples and then varying them than by starting from a blank box. Applied here: do not write every prompt from scratch. Take a strong image you admire, work out what its prompt probably controlled (subject, light, framing, style), then rebuild it in a different topic. Imitation with understanding teaches far more than open-ended guessing. Keep a personal library of these worked examples, each annotated with what every part of the prompt controlled.
Fast feedback loops. Improvement is the act of closing the gap between what you made and what you intended. The faster you see the gap, the faster you close it. Compare each result to a clear target, name the single thing that is off, and fix only that next. A community of other creators, or even a brutally honest friend, shortens this loop dramatically because you are too close to your own work to see its flaws.
Spaced practice and retrieval. Work by Roediger and Karpicke and others shows that short sessions spread across days beat one long marathon, and that retrieving a skill after a gap builds far more durable memory than re-reading. So rotate skills across the week rather than cramming one, and test yourself: write a prompt for a known style from memory, generate it, then compare against your saved template and note what your memory missed.
Cognitive-load management and deliberate play. Working memory is small. Trying to learn JSON, consistency, and editing on the same day guarantees overload and nothing sticks. Isolate one micro-skill at a time. Then, to keep motivation and find new ideas, set aside some time each week for free experimentation with odd styles or surreal concepts, using a fixed seed so any happy accident can be reproduced. Structured drills build precision; play rebuilds energy and discovers technique.
One more, because it is the most common failure: escape tutorial hell. Watching without making gives the dangerous illusion of competence. The rule that fixes it is simple. Never watch a second tutorial before you have applied the first one to your own image.
The prompt framework, taught properly
There is one prompt system at AI Video Bootcamp, taught at two levels. Beginners start with a friendly six-part recipe; as control grows, it ladders into the canonical house standard, the 5-Element Prompt Grammar. They are the same idea at two resolutions, so you never have to unlearn anything.
The six-part recipe
A good prompt does not need to be long. It needs to be complete. Fill in the parts the image needs:
- Subject - who or what is in the image, with concrete detail.
- Environment - where it is, and what is in the background.
- Camera - angle, shot type, lens, and framing.
- Lighting - the direction and quality of the light.
- Mood - the feeling or atmosphere.
- Style - the look or medium.
Official prompting guidance from OpenAI and Google converges on the same components: name the subject, the setting, the composition and camera, the light, the mood, and the style, usually in one to three clear sentences. The recipe is just that, made memorable.
The 5-Element Prompt Grammar
As you mature, the six fold into the five-element grammar that professionals and our AI Image Prompt Cheat-Sheet use, and that is built into our PromptWise studio:
- Subject - the core entities and action.
- Style - the aesthetic and mood, with a named anchor.
- Composition - spatial arrangement, environment, framing, aspect ratio.
- Technical - lighting, lens, resolution, color grade.
- Negatives - the things to exclude.
A useful refinement on that last one is semantic negative prompting. Rather than listing isolated words like “no cars” or “no text,” describe what you do want instead, such as “an empty street” or “a clean landscape with no signage.” Modern models follow a positive description of the desired result far more reliably than a list of forbidden words.

The mapping is clean: your Environment and Camera live inside Composition; the lens part of Camera plus Lighting live inside Technical; Mood folds into Style; Subject stays Subject; and the grammar adds Negatives, the explicit “do not” list. You keep your beginner mental model and simply gain more control as you learn about layout, aspect ratio, and constraints.
Audit a failing render by element
The real payoff of naming the elements is speed of diagnosis. When an image fails, you do not rewrite the whole prompt and hope. You check the drawers:
- Wrong or vague subject, strengthen the Subject with specific nouns, attributes, and action.
- Chaotic composition, simplify Environment and Camera and set an explicit aspect ratio.
- Flat or muddy light, restate one clear light source and time of day, and remove conflicting lighting terms.
- Mood is off, swap the mood words and make sure Style agrees with them.
- Stray text, extra fingers, or watermarks, add Negatives.
One vocabulary, a fast diagnosis, every model. That habit alone separates people who improve from people who tinker.
Model foundations, kept proportionate
You need just enough to pick the right starting tool. Depth on the tools themselves lives in our A-Z Encyclopedia and our GPT Image 2.0 vs Nano Banana Pro comparison. Pricing below is per image on fal.ai, verified June 2026, and changes often.
GPT Image 2.0, inside ChatGPT. The best all-rounder and the strongest at legible on-image text and conversational editing. It uses an autoregressive design, which is part of why text and layout land so well. Roughly $0.009 to $0.41 per image depending on quality and resolution.
Nano Banana Pro, inside Google Gemini. Built on Gemini 3 Pro, it leads on intent, structure, and consistency, with masked editing, color grading, and multi-image fusion for holding a character or brand steady. Around $0.15 per image.
Ideogram 4.0. The pick for typography, posters, and design, with state-of-the-art text rendering and layout control; it is open-weight. Roughly $0.03 (Turbo), $0.06 (Default), and $0.09 to $0.10 (Quality) per image.
Start in the consumer apps, which are free to begin with. Move to OpenAI Playground or Google Flow, or to fal.ai, only when you want advanced controls like a fixed seed or batch runs. And resist switching tools too early: pick one and learn it before you judge it.
Practice the six elements, one at a time
This is where the skill is actually built. Each element gets its own focused drill, the way a photographer practices light separately from composition. Hold everything else fixed and move only the element you are studying.
- Subject. Generate one subject ten times where only the pose changes, then ten more where only the wardrobe changes. You are learning what the model treats as identity versus decoration.
- Environment. Keep the subject fixed and place it in five settings: studio, street, forest, office, and a surreal interior. Write one sentence on how each environment changed the read of the image.
- Camera. Render the same subject as a close-up, a medium shot, a wide shot, and an overhead. Note what changed emotionally and compositionally, not just visually.
- Lighting. Fix subject, environment, and camera, then produce six lighting variants only: soft window light, golden hour, studio, hard midday sun, rim light, neon night. Score each on realism and emotional fit.
- Mood. Make three versions of one scene, tranquil, ominous, and playful, without changing the plot. Only the mood words move.
- Style. Take one scene and render it as a photo, a magazine editorial, a watercolor, and a poster. Then explain which parts changed because of style and which should have stayed constant.
A useful habit alongside these drills: study real references. Cinema and photography solved lighting and composition long before AI existed. Browsing a reference library like ShotDeck, or simply analyzing photos you admire, trains your eye faster than generating in a vacuum.
The intermediate milestones
Past basic prompting, three skills separate someone who makes nice one-offs from someone who delivers reliably.
Non-destructive editing. The jump from re-rolling to editing. Instead of regenerating a whole image because of one flaw, you change the smallest possible thing and protect the rest: “keep the same face, outfit, lighting, and background, only fix the right hand.” GPT Image 2.0 and Nano Banana Pro both support masked edits, background replacement, and color grading. Learning to edit rather than re-generate is a major efficiency jump and the difference between a lucky image and a finished one.
Consistency as a workflow. The single turning point from hobby to paid work, and the place most learners plateau. It is a system, not a trick. Build a clear reference of your subject (a full-body turnaround and a close-up of the face), keep the description word for word identical, reuse it, fix the seed where the tool allows, and make small controlled changes only. Nano Banana Pro is the strongest of the three here. The discipline that matters most is saving your prompts, seeds, and settings so every result is explainable and repeatable.
Use-case specialization. A good real estate photo is judged nothing like a good poster. Picking one lane teaches you what “good” means in context and is where paid work begins:
- Product and e-commerce: accurate object, clean background, lighting that flatters the product, on-brand.
- Posters and marketing: readable text, clear typographic hierarchy, a layout grid, one strong message. This is Ideogram 4.0 territory.
- Real estate and architecture: believable proportions, controlled wide-angle lenses, natural light, no impossible furniture.
Specialization means building domain-specific prompt templates and editing habits, then testing them against real briefs and constraints, not just your own taste.
Time-to-competence, and the plateau
Honest ranges. These are for creator prompting, not for learning the math behind the models. With short, regular practice, most engaged learners see:
- About two to four weeks for basic control and the six-part recipe.
- About two to three months for reliable control, editing, and consistency in one use case, at three to five sessions a week.
- About four to six months for a distinct, sellable style and paid-quality reliability.
Treat these as signals, not promises. They depend on deliberate practice, not hours logged. Ignore the “learn generative AI in three to four months” figures you see elsewhere; those usually bundle Python and machine-learning theory that this skill does not require.
The “good enough” plateau. After fast early progress, almost everyone stalls. The mechanism is quietly brutal: once your results look acceptable, practice slips onto auto-pilot and stops producing improvement, often within the first fifty or so hours. You stop getting better not because you hit a ceiling, but because you unconsciously decided your current level is fine.
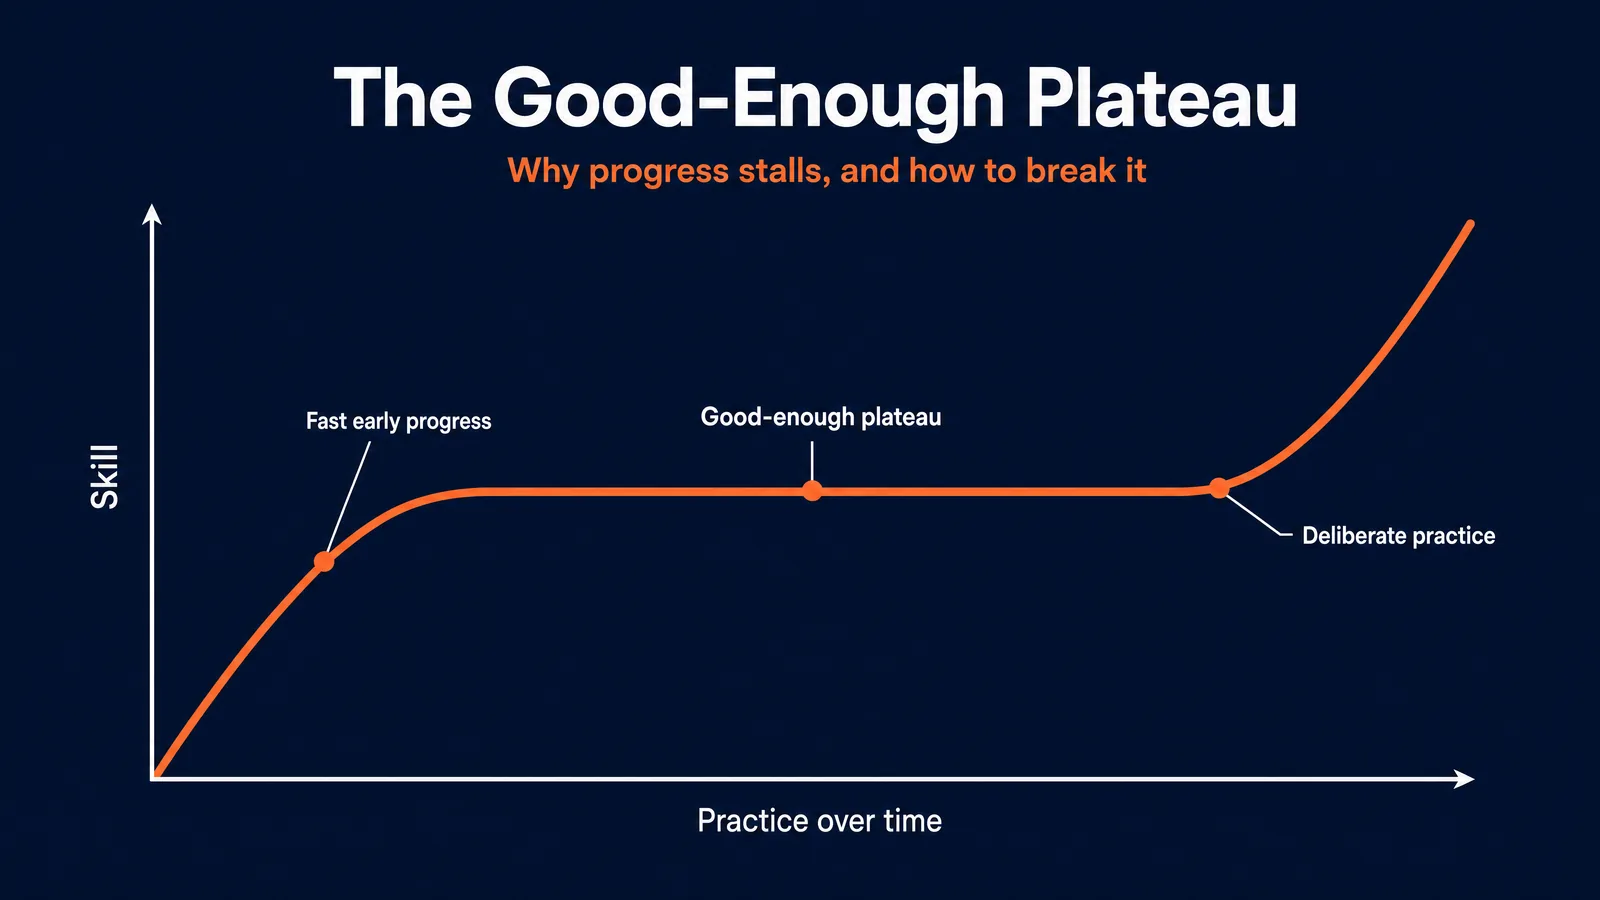
How to break it. The research points to one answer. Fitts and Posner identified three keys to pushing past a plateau: focus on technique, stay goal-oriented, and get immediate feedback. In practice: find your single weakest element (usually lighting or composition), set a target a notch beyond your current level, and run focused reps with fast critique. Make practice different from your comfortable performance, and change the drill the moment it starts feeling easy.
Here are the plateaus by name, with the fix for each:
| Plateau | What it looks like | The fix |
|---|---|---|
| Vague prompts | ”Fine but not great,” generic outputs | Adopt the six-part recipe; specify environment, camera, and lighting explicitly |
| Wrong-model habit | Forcing one tool to do everything | Match the model to the task (text to Ideogram, consistency to Nano Banana Pro) |
| Over-editing | Each edit adds artifacts | Return to a clean base, simplify edits, clarify the technical instruction |
| ”Good enough” stall | You stop pushing once results look decent | Set a new target (character consistency, poster typography) and score every output |
A multi-week study plan
A plan turns all of this into a habit. Each week names a focus, exercises, and a checkpoint tied to a rung on the ladder. Six weeks gets a motivated learner to reliable intermediate control; repeat the cycle with new subjects to go further.
| Week | Focus | Exercises | Checkpoint |
|---|---|---|---|
| 1 | The six-part recipe | Simple portraits and objects; change one element per batch | You can predict how changing one element will move the result (Rung 2) |
| 2 | Composition and technical | Explicit aspect ratios and camera terms; compare lenses and light | You can design a clear composition and hit a desired light (Rung 2 to 3) |
| 3 | Editing | Background swap, color grade, object removal while preserving the subject | You make clean edits across several images (Rung 3) |
| 4 | Consistency | Build a reference; place one character in three scenes | You hold a recognizable character across scenes (Rung 4) |
| 5 | Typography and layout | Posters and on-image text in Ideogram 4.0 | You produce readable, well-laid-out text graphics (Rung 5) |
| 6 | Specialization project | One lane; a 10 to 20 image mini-portfolio | Images meet a self-set quality bar and share an aesthetic (Rung 5 to 6) |
A good weekly rhythm has four short blocks: study one official guide or worked example, run one constrained drill with a single variable changed, critique your own outputs against a rubric, then a few days later repeat an earlier drill to exploit spacing and test retention.
How to judge your own work
Most beginners assess images with one question: is this pretty? That is the wrong question, because pretty is luck. The right questions are “can I explain what I changed?” and “did only that variable move?” To make critique objective, score against a rubric instead of a vibe.
| Criterion | Weak | Strong |
|---|---|---|
| Subject control | Subject is vague or drifts | Subject is precise and repeatable |
| Environment | Background feels generic or disconnected | Setting meaningfully shapes the read |
| Camera intent | Framing feels accidental | Camera choice adds narrative or aesthetic value |
| Lighting | Flat, muddy, or inconsistent | Deliberate, legible, emotionally effective |
| Mood | Mood words do not match the image | Mood is specific, controlled, and felt |
| Style discipline | Style labels overwhelm the image | Style is controlled without breaking fundamentals |
| Editing reliability | Edits create drift or damage | Edits are surgical and dependable |
| Reflection | No notes, no diagnosis | Clear diagnosis and a next-step decision |
Run this on your weekly set. The lowest-scoring row is your next deliberate-practice focus. That is the entire loop.
A project ladder to prove it
Drills build elements; projects force you to combine them under a real constraint, which is what actual work feels like. Climb these in order, and judge each against its pass standard, not your mood.
- Portrait control set. A nine-image grid of one fictional person with controlled changes in angle and light. Pass standard: a viewer can identify the subject and see the intended shot differences.
- Scene translation. One subject moved across several environments and moods. Pass standard: the changes feel intentional and legible, not random.
- Revision log. One base image plus five careful edits with notes on what changed and what stayed fixed. Pass standard: each edit preserves the successful traits of the base.
- Poster campaign. Three related posters for one event or brand. Pass standard: legible typography, consistent style, clear hierarchy.
- Character mini-series. A four-frame story with the same character in different contexts. Pass standard: the identity holds well enough for narrative continuity.
Finish these, even imperfectly, and you will have done something most learners never do: shipped real, constrained work and proven you can control it.
How we teach this at AI Video Bootcamp
Everything above works on your own. It works far faster with a clear path, fast feedback, and people learning beside you, which is exactly what AI Video Bootcamp is built around. The method has a simple name, Learn, Practice, Earn, and it rests on three parts.
A structured path, not a pile of tutorials. The course is a sequential nine-phase curriculum where each phase builds on the last, so you are never guessing what to learn next. The early phases are this roadmap in much more depth: Phase 1 (Initiate) covers foundations and your first setup, Phase 2 (AI Images) is full image creation and editing, and Phase 5 (Character Consistency) goes deep on the exact identity-locking that separates hobby from paid work. From there the path continues into video, sound, ads, social media, filmmaking, and automation, so the image skills you build here lead somewhere.
A community that gives you the fast feedback solo learners never get. This is the part that moves the needle most, because the whole skill turns on closing the gap between intent and output quickly. More than 23,500 members are active, with thousands of interactions a day, so when you post a work-in-progress you get specific critique in minutes instead of silence. It is deliberately welcoming to complete beginners, and the steady pace keeps you producing rather than just watching. Progress is gamified, with engagement points and unlockable titles, so showing up and helping others is part of how you move forward.
A way to earn from the skill. The method does not stop at making images. Members get pointed at real income through community contests with cash prizes, freelance and agency work, faceless channels, selling prompt and template packs, and running AI influencers built on the same consistency skills above.
It runs on Skool for $9 a month, with no lock-in, and you can cancel anytime. We are also building PromptWise, a studio that bakes the 5-Element Grammar and the newest models into one guided workflow, so the system in this guide becomes one place instead of five browser tabs. It has not launched publicly yet. If you want the guided version of everything here, join us on Skool.
Where to go next
This roadmap is the map. When you are ready to go deeper on any part of it:
- Master prompt structure with the AI Image Prompt Cheat-Sheet.
- Look up any term in the AI image and video glossary.
- See the wider picture in how to learn AI video and image creation.
Frequently asked questions
How long does it take to get good at AI image generation?
With short, regular practice, most people reach basic control in two to four weeks, reliable control in two to three months, and a distinct, sellable style in four to six months. The pace depends on practicing deliberately, working on your weakest element with fast feedback, not on how many hours you log or tutorials you watch.
Do I need to understand the technology or know how to code?
No. You do not need the math behind diffusion or any coding. You need enough visual literacy to notice what changed when you altered framing, light, color, or style, plus the willingness to keep notes and practice deliberately. The tools run in your browser.
What is the single fastest way to improve?
Change one element at a time and compare. Holding everything fixed while you move only the lighting, or only the camera angle, teaches you the cause and effect that lucky prompting never does. Pair it with fast feedback, from a rubric or a community, and you improve far quicker than by generating randomly.
Why do I get stuck after I am “okay” at this?
That is the “good enough” plateau. Once results look acceptable, practice quietly goes on auto-pilot and stops improving you. Break it by picking your weakest element, setting a target just beyond your current level, and drilling it with feedback, then changing the drill as soon as it feels comfortable.
Which tool should I learn first?
Pick one and stick with it for a few weeks. ChatGPT with GPT Image 2.0 is the easiest all-rounder and the best at on-image text. Choose Google Gemini with Nano Banana Pro if you mainly want consistency and structured scenes, or Ideogram 4.0 if you mainly want posters and typography. Switching tools